
Loading...
Loading...
Loading...
Loading...
Loading...
Loading...
Loading...
Loading...
Loading...
Loading...
Loading...
Loading...
Loading...
Loading...
Loading...
Loading...
Loading...
Loading...
Loading...
Loading...
Loading...
Loading...
Loading...
Loading...
Loading...
Loading...
Loading...
Loading...
Loading...
Loading...
Loading...
Loading...
Loading...
Loading...
Loading...
Loading...
Loading...
Loading...
Loading...
Loading...
Loading...
Loading...
Loading...
Loading...
Loading...
Loading...
Loading...
Loading...
Loading...
Loading...
Loading...
Loading...
Loading...
Loading...
Loading...
Loading...
Loading...
Loading...
Loading...
Loading...
Loading...
Loading...
Loading...
Loading...
Loading...
Loading...
Loading...
Loading...
Loading...
Loading...
Loading...
Loading...
Loading...
Loading...
Loading...
Loading...
Loading...
Loading...
Loading...
Loading...
Loading...
Loading...
Loading...
Loading...
Loading...
Loading...
Loading...
Loading...
Loading...
Loading...
Loading...
Loading...
Loading...
Loading...
Loading...
Loading...
Loading...
A snapshot overview of our major versions
In this section, you will find the release notes for each version we release under this major version. If you are looking for the release notes of previous major versions, use the version switcher at the top left of this documentation book. Here is a breakdown of our major version releases.
Version 6 is a major architectural shift for ContentBox as we expand its API headless capabilities, introduce content templates, upgrade to ColdBox7, solidify the multi-site core, and much more.
Version 5 is a major architectural shift for ContentBox as we go Multi-Site and Hybrid headless API, upgrade to ColdBox6, with over 145 improvements and new features.
Version 4 focused on upgrading its internal core to ColdBox 5 and providing more modular development around its core. We introduced the contentbox-custom module so you can have your assets externalized from the CMS core. We also added tons of security features, such as two-factor authentication.
Version 3 also focused on a major ColdBox upgrade and a new admin interface.
In this version, we introduced the content hierarchy and pages. It was a major leap to a full-fledged CMS.
Our initial CMS release
Across the top of the ContentBox Dashboard is the header bar. Let's take a look at the icons and buttons, from left to right. On the upper left, next to the ContentBox logo (which will return you to the dashboard), is a button that allows you to toggle the menu. Clicking this button allows the main content of the page to occupy more real estate. To the right of this button is a robust global search feature that categorizes your search results into ContentStore, Page, and User.
In the upper right corner of the header are four buttons. The first is the House icon which takes you to the active site's homepage. To its right is the Plus icon, which allows you to add content, including new pages, new content store items, new users, new media, and new menus. The third button, second from right, is a Gear icon which allows you to perform cache-clearing functions, including RSS caches, content caches, the template cache, and more. You can also reload ORM as well. You can even reload every single module that you have available at ContentBox - your entire application - from this menu.
In the main section of the Dashboard you have three tabs: Content Reports, Recent Comments, and Recent News. The data in the Content Reports tab contains your latest edits, followed by other types of content: Future Published, Expired, and Drafts.
To the right of the main, three-tabbed section you can find the right panel, which is divided up into three sections: Data Snapshots, Latest Logins, and a Help Section. Under the first section, Data Snapshots, you can check on the Top Hits & Comments, Discussion Counts, and Content Counts. These expandable menu selections allow you to drill down to get more detail on your site's popular pages, pending approvals, and other important statistics.
Everything you see through the site has what we call a Quick View. By right-clicking on any instance you can get the content immediately as a Quick View so you can edit or actually view it and see the content within. Note: You can’t Quick View the Content Store.
Before diving into ContentBox, we recommend you to take a few minutes to get to know your Dashboard.
Relocations allow you to easily migrate from previous site URLs or to move items within the sitemap to other locations, without losing SEO value from previous locations or external links.
Content Templates allow you to pre-define configuration settings and customizations for Pages, Entries, and Content Store items.
ContentBox is a CMS built by developers, for our own use. We obviously try and cater to the usual CMS functionality features, but being developers, we tried to throw a couple of extra goodies into ContentBox.
In this section, we'll give you a few tips about the different editors available and some of the features common to all of the editors.
Our about page is very useful. Apart from your build information, it contains keyboard shortcuts! ContentBox has a lot of keyboard shortcuts available for you, and once they are memorized, you can easily navigate using them. Also, for you module developers, we have an API based on a jquery javascript library. You can do data binding for your own shortcuts, so it's very easy if you want to offer your own keyboard shortcuts.
ContentBox allows you to create and publish content directly from the Administrator. There are two main sections where you can do this
Blog | You can create and publish blog posts.
Sitemap | You can create and publish pages
ContentBox allows a variety of ways to customize and group your page and entry content.
[Content + Media manager] Media manager is an embedded media manager that we ship with ColdBox. If you are an administrator you have different libraries [Switch Library drop down menu; top right] that you can manage. For example, [click widgets in the DDM] you can manage the widgets, so you can install manually other widgets or download some of the widgets that you have available here.
[Switch Library + Update] You can check out the auto update channel so you can actually do any type of modifications. It’s up to you what you want to do with this [switch to list view]. Obviously, an administrator can choose all the different things [select new ‘blog folder’ & click X to delete] and all different permissions. You can do this [hover in circle] as well.
Bump follow-redirects from 1.15.4 to 1.15.6 by @dependabot[bot] in #605
[Snyk] Upgrade @alpinejs/focus from 3.13.5 to 3.13.6 by in
Bump braces from 3.0.2 to 3.0.3 by [bot] in
Update RateLimiter.cfc, fix for CONTENTBOX-1512 by in
Resolve CONTENTBOX-1511 by in
Fix_postgres_quoted_columns by in
Update seed_permissions.cfc by in
CONTENTBOX-1517 Update SecurityValidator.cfc by in
Bump cross-spawn from 7.0.3 to 7.0.6 in /modules/contentbox/themes/default by [bot] in
Bump webpack from 5.89.0 to 5.94.0 by [bot] in
Bump nanoid from 3.3.6 to 3.3.8 in /modules/contentbox/themes/default by [bot] in
Bump braces from 3.0.2 to 3.0.3 in /modules/contentbox/themes/default by [bot] in
Patch/performance fixes by in
Bump webpack from 5.90.1 to 5.97.1 in /modules/contentbox/themes/default by [bot] in
fix: update user-agent bots regex by in
Bump serialize-javascript and mocha by [bot] in
Bump serialize-javascript from 6.0.1 to 6.0.2 in /modules/contentbox/themes/default by [bot] in
CONTENTBOX-1524 index names have to be unique with postgres, so rename idx_deleted by in
Bump @babel/runtime from 7.18.3 to 7.26.10 in /modules/contentbox/themes/default by [bot] in
Bump @babel/helpers from 7.18.2 to 7.26.10 in /modules/contentbox/themes/default by [bot] in
Bump brace-expansion from 1.1.11 to 1.1.12 in /modules/contentbox/themes/default by [bot] in
by in
Bump brace-expansion from 1.1.11 to 1.1.1
ACF Compatibility Updates
Developers are getting more and more familiar with Markdown, and it's actually preferred by a lot of developers when it comes to writing documentation and blog posts, and that is why we give you native support of Markdown in the ContentBox editor. We also threw in a few other features when adding support, some might just save you hours of work.
We have included a new code editor that supports HTML and Markdown natively. This will allow developers or editors to write in native markup and have all the integrations into ContentBox.
The new editor also sports real time previews and side-by-side editing in full screen. Your editing experience is about to get a whole lot better now.
The Content Store allows you to create reusable elements, which can be rendered in Pages, Entries, or other Content Store items
Often, there are items which a user wishes to be dynamic in a content layout, template or even a custom view. The ContentBox Content Store allows you to create and group these reusable elements.
Let's say, for example, that you wish to include a block of Contact information in the footer of your site. You could code that directly in to your , but by using the Content Store, you make that content easily editable by Editors and Administrators of your site.
To create Content Store custom content, navigate to Content > Content Store in the sidebar menu and click the "Create Content" button. Then provide your custom content in the editor.
Note the slug value in the editor. You will use this slug to retreive the custom content item in your layout.
Open your them layout or footer view and insert the custom content reference using the shorthand annotation like so:
Running a website, on top of your normal job duties can be a lot of work. Time is valuable, and important when trying to plan your content and the corresponding social media publication. This is the reason why we created an important ( but often overlooked ) feature, Publication and Expiration dates for content. You might be surprised what in ContentBox is date controlled.
This is most useful when scheduling blog posts. Blog posts can take a long time to write, and post, and with busy schedules this might not get done. This is why at Ortus Solutions, we try to write our blog posts, and schedule them ahead of time. When editing a blog post, in the right hand side 'sidebar', you will see these options at the top of the sidebar.
You can set the publish date / time, and the post will go live at the right time for you.
ContentBox is a modular hybrid (Headless+Full) content management system based on HMVC and modern principles.
ContentBox is a professional open-source hybrid modular CMS (Content Management System) that allows you to easily build websites, blogs, wikis, complex web applications, and even power mobile or cloud applications. Built with a secure and flexible modular core, designed to scale, and combined with world-class support, ContentBox will quickly get your projects out the door.
Contentbox has many options for creating and managing content, which are accessible through the ContentBox Administrator:
Blog entries
Categories
Content Store Items
Apart from the widgets you also have the ability to insert entries from the Content Store [contentstore icon], to link to specific pages [ link icon], or to link to a specific entry [pencil icon]. You can also insert different media items and images [image icon].
For example, to link a few words [select a word from TEXT] to a specific page, highlight the desired words and click the [Link Page] icon. This will display a list of all pages in ContentBox from which you can choose the desired page to link to and even specify whether the link should be SSL or not. The same can be done with ContentBox blog entries.
You can also insert from the Content Store [ccontentstore icon]. You can try inserting something from the Content Store you will see it creates a kind of pseudo Markup. ContentBox will automatically render this content when the page is viewed.
Hint [clicking the eye or type CTRL+P] to get a preview and to actually see the translation of that markup.
As an administrator here you have full control of how this editor looks like. So for example right now you are seeing every single option known to man. However, you can basically limit this for editors. You can limit actually all the controls that you are seeing. So you have all control of how everything looks and feels. So if you need to make it simpler you can really do so very easily.
ContentBox 3.1 now supports the generation of static sites from your content and even your blog. This is a great addition to ContentBox as now you can produce static versions and workflows, deploy to CDN networks, secure your content and much more. Once you click on the Start Generation button, ContentBox will go over your entire site and produce a static archive for you in the associated theme. It will also announce two interception points for you during the process:
cbadmin_preStaticSiteExport : Receives all the export options in the intercept data so you can alter the export behavior.
Media Manager
Menu Manager
Sitemap ( Pages )
In the following chapters you'll find an quick overview of each one of these options.
pages.cfm (Mandatory layout used for all pages by convention)
maintenance.cfm (Optional used when in maintenance mode, else defaults to pages)
search.cfm (Optional used when doing searches, else defaults to pages)
{{{ContentStore slug='contact-information' }}}Now your Content Store item will render in the footer of your site theme and can easily be changed from within the administration
As you can imagine, there are a lot of widgets you can use in ContentBox. Most widgets have specific and larger functionality… sometimes you might want something quick and simple… like outputting a single variable. You can output any RC or PRC variable with a simple helper function.
RC - Request Collection
PRC - Private Request Collection
The underlying framework (ColdBox) will merge the incoming URL/FORM/REMOTE variables into a single structure called the request collection structure that will live inside the request context object. We also internally create a second collection called the private request collection that is useful to store data and objects that have no outside effect.
The code below allows you to easily output from any of these source:
${rc:name}
This will output the name variable from the RC scope.
This means you can output URL variables in your content. Look at this example, with the following url
mydomain.com/?name=Gavin Pickin
You could access the name with ${rc:name}
You can tap into more items in the RC and PRC scopes as well, but you have to remember, you cannot output a struct to the page, only strings.
This gives you some nice options for form submissions, searches, and ways to add more information to a normal pages if you write your own modules.
If you actually want to use the text above, without trying to output a variable, you can escape the code.
<escape>${rc:name}</escape>
If you do not escape the variables, and the variable doesn't exist, you'll see an error message like this:
Error translating setting on target prc:page.renderContent(): The variable: page.renderContent() is undefined in the request collection (private=true) Keys Found: META,currentLayout,CBENTRYPOINT,currentRoutedURL,layoutmodule,currentView,CBROOT,layoutoverride,CBWIDGETROOT,CBSETTINGS,COMMENTSCOUNT,CATEGORIES,cbox_incomingContextHash,currentRoute,CBADMINENTRYPOINT,COMMENTS,PAGEOVERRIDE,OCURRENTAUTHOR,CBTHEME,CBTHEMEROOT,currentViewArgs,PAGE,viewModule Error translating setting on target rc:lastname: The variable: lastname is undefined in the request collection (private=false) Keys Found: namespaceRouting,event,pageSlug,format,namespace
Any setting stored in ContentBox can be output using the following markup: ${setting_name}. This is a great way to create site-wide static settings that can be output in any editor.
ContentBox can be installed in multiple approaches
We are so excited you are here and ready to get started with ContentBox Modular CMS one of the most modern ColdFusion (CFML) Content Management Platforms. There are several ways to install ContentBox, so make sure you explore all the options. We strongly recommend using our contentbox-cli to install ContentBox as it is the easiest way to get started.
[Look & Feel + Layouts] Now, Look and Feel are obviously very important. So you have our layouts section. As you can see some of our sections are tied to forgebox [ForgeBox upper right corner].
Again this is administration permission, but you can actually talk into ForgeBox [click ForgeBox] so you can connect to ForgeBox. It will bring you all the different setups available that you can install immediately. If you download a layout, for example, you can then go to your Manage Layouts.
[click manage layouts / left side panel] and you can see that the new layout will be there. If you want to set it as your current layout you can go ahead and activate it [click Activate for the layout]. You can go to your site and check your new layout. So very easy [back to admin \/ active layout] you can now start skinning or downloading themes.
If you are building themes just please remember to contribute to ForgeBox so everybody can benefit.
[Manage Layouts] Management is for you to be able to see which layouts you have. Activate them, upload them, if you need to upload a new theme [Upload layout / up right], rebuild the internal registry, or do any kind of clean up.
templates (The folder that contains optional templates for collection rendering that are used using the quick rendering methods in the CB Helper. See below for additional information)
category.cfm (The template used to display an iteration of entry categories using coldbox collection rendering)
comment.cfm (The template used to display an iteration of entry or page comments using coldbox collection rendering)
entry.cfm (The template used to display an iteration of entries in the home page using coldbox collection rendering)
The individual files included in the templates directory are a single .cfm files used by ContentBox to iterate over a collection (usually entries or categories or comments) and render out all of them in uniformity.
Please refer to ColdBox Collection Rendering for more information.
Each template receives the following variables:
_counter (A variable created for you that tells you in which record we are currently looping on)
_items (A variable created for you that tells you how many records exist in the collection)
{templateName} The name of the object you will use to display: entry, comment, category
Layout Local CallBack Functions:
onActivation()
onDelete()
onDeactivation()
This is found under the System menu in the navigation on the left. Settings is a tabbed page listing 10+ options control panels. This includes all the core settings, but is also open to module developers, to inject their own settings.
Expiration dates are useful too, but not a normal use case for blog posts… but these scheduling options are not just available for blog posts. Expiration dates work great for webinars or other events, where a sign up page should be removed after event sign ups close, or maybe a special or promotion that should only who while it's active. This will even show and hide menu items in your navigation.
Lets look at the Page Details version of the Publishing options
As you can see, they are exactly the same. This makes it familiar and easy to work with. This is also the case for Content Store items… which gives you even more options in regards to scheduling content.
ContentStore items can be included inside of pages and blog posts too, which means you can include a time-based piece of content into your homepage, to show upcoming events, or show a link to a signup page for an event, and then hide the link when the registration period is over.
This is a nice feature, which at the surface looks simple but useful, but with this feature working with ContentStore items as well, the options are endless.
Hybrid - ContentBox is a headless CMS and a fully-featured traditional CMS. Have the freedom to use one or both! You have the power now!
ContentBox is maintained under the Semantic Versioning guidelines as much as possible. Releases will be numbered in the following format:
And constructed with the following guidelines:
Breaking backward compatibility bumps the major (and resets the minor and patch)
New additions without breaking backward compatibility bump the minor (and resets the patch)
Bug fixes and misc changes bump the patch
ContentBox Modular CMS is Professional open source and licensed under the Apache 2 License. Ortus Solutions, Corp, the makers of ContentBox, can also offer commercial and supported versions.
Copyright by Ortus Solutions, Corp
ContentBox is a registered trademark by Ortus Solutions, Corp
Professional licenses available with different SLAs: https://www.ortussolutions.com/services/support
The ContentBox discussion group and community can be found here: https://community.ortussolutions.com/c/communities/contentbox/15
We all make mistakes from time to time :) So why not let us know about it and help us out? We also love 😍 pull requests, so please star us and fork us: https://github.com/Ortus-Solutions/ContentBox
ContentBox is a professional open source software backed by Ortus Solutions, Corp offering services like:
Custom Development
Professional Support & Mentoring
Training
Server Tuning
Security Hardening
Code Reviews
Official Website: https://www.contentboxcms.org
Source Code: https://github.com/Ortus-Solutions/ContentBox
Twitter: @gocontentbox
Facebook:
Vimeo Channel:
Ortus Community:
Because of His grace, this project exists. If you don't like this, don't read it; it's not for you.
"Therefore being justified by faith, we have peace with God through our Lord Jesus Christ: By whom also we have access by faith into this grace wherein we stand, and rejoice in hope of the glory of God." Romans 5:5
ContentBox itself is made up of 3 separate Modules ( and their submodules ), ContentBox, ContentBox-Admin and ContentBox-UI. One of the best security features of ContentBox is the fact that you can remove the Admin module from your production installs, removing the ability for the admin to get hacked, because it is not even present on your production server.
cbadmin_postStaticSiteExport : Receives all the export options and also a results structure with the following keys: exportLog:builder, exportDirectory, exportArchive. This is a great way to listen for the export and send to S3 for archiving, etc.Warning Dynamic elements like commenting, searching, etc must require a JavaScript implementation. So make sure you have a static export strategy in place.
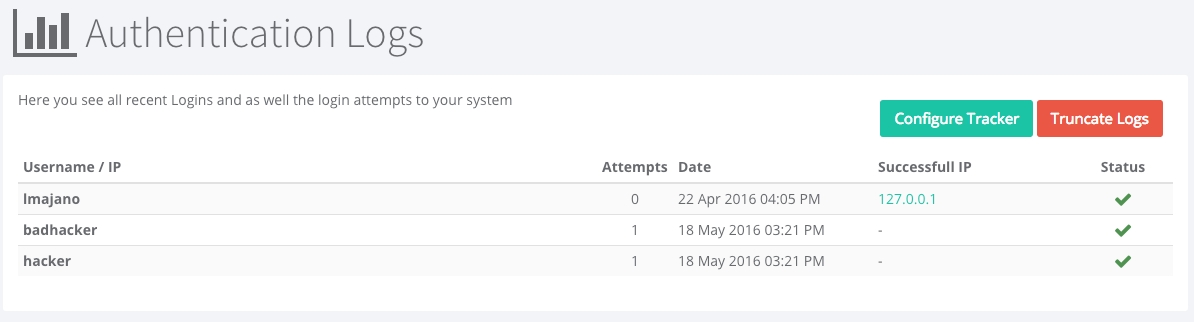
You can click the Configure Tracker button from the Auth Logs screen, or click on System > Settings > Security Options
Learn how to upgrade ContentBox CMS with just a couple of steps.
ContentBox is upgraded using CommandBox via the CLI. If you are upgrading from minor to minor/patch level, most likely you won't need to follow an upgrade guide. However, if you are upgrading between major versions make sure you visit each of the major versions' upgrade guide first.
Make sure you backup your database and source, just in case. We recommend running this against a development instance first and then moving on to production instances.
When you are ready with your backups, open up a CommandBox shell using box in the root of your project.
Make sure your .env and credentials are seeded
This will update ColdBox and ContentBox respectively and any other dependencies listed in your box.json
Now that the ContentBox source has been upgraded, let's run the database migrations
Once they run, you are ready to roll!
The ContentBox team can also do the heavy lifting for you as we are a professional open source project. So just contact us and we will update or install any ContentBox instances in a secure and fast way!
If you encounter any issues upgrading, please make sure you contact us via our
When you or your team log into your ContentBox site, you see your ContentBox Dashboard. You can see recent content, recent comments, recent news, some data snapshots… but you can also quickly customize this to help your team communicate. It is as easy as changing a few ContentBox admin settings.
Click on System > Settings and then click on Admin Options.
You can change the Title / Welcome that shows up on the dashboard.
You can update the Dashboard message, so when everyone logs in, they're reminded of some of your rules, regulations, or maybe a holiday message. As seen above:
One of the nice touches I think, is you can update the NEWS RSS feed. This allows you to add some humor to your day, by adding something like Dilbert's RSS feed… or maybe you can use an aggregator to follow what is happening in the CFML world, or maybe some blogs which you need to read and then update your audience.
You can set the number of items to show up in your dashboard, by type. Set the number for each of the following:
News Feed Count
Recent Entries Count
Recent Pages Count
Recent Content Store Count
These default to 10 when first installing ContentBox
You also have control of your Website paging, on the front end, for blog posts, as well as content in the back end of your website.
We have introduced local storage auto saving capabilities for all editors in ContentBox. No matter the implementation, we will provide auto-save capabilities. This is a great way to know that silently your work is secure. I don't know how many times I select all and type by mistake. This feature has saved my bacon, and now you know about it, it could save you too.
With any Bulletin Board Forum, or CMS, they each have their own syntax for special markup. You can now use the <escape></escape> syntax in any content editor to escape ContentBox translations for settings, markdown, etc.
All live previews are now responsive, meaning you can choose from the responsive previewer the type of device and get immediate feedback of the content result in real-time.
The content editors have been completely re-designed for a mobile first paradigm. They sport new tabbed interfaces for history, comments, custom fields and editing. You also have much more real estate when editing and even full screen editing support...including auto shrinking the left side bar, with an option to shrink the right sidebar too.
Widgets are small pieces of software that you can add to your ContentBox website to perform a specific function. There are several Widgets built into ContentBox that are used for various parts of your website, and you can insert widgets into blog posts and pages to make your website even more dynamic.
Widgets are one of the ways ContentBox is extendable, you can install modules and themes that overwrite existing widgets, or are brand new... or you can create or customize your own widgets.
Widgets are maintained through the Administrator under Look & Feel > Widgets. You can managing existing widgets, upload new widgets, or download widgets from Forgebox.
In this section of the documentation, you will learn how to use Install, Manage and Use Widgets To learn how you can develop your own widgets, read this section under Developing for ContentBox
Blogging capabilities are an essential component for any website and web application. Blog entries help provide more context around products, services. It inherently creates more online presence and, if managed properly, better search engine results.
ContentBox comes with a built-in blog which you can turn ON and OFF from System > Settings. The default setting is ON.
The main Blog page in your ContentBox Administrator shows a table with all your blog posts. We have 3 useful indicators.
Shows if your post has been published
Shows the numbers of views
Shows the number of comments
And you also have quick actions:
Where you can check the info related to each individual post
And entry actions
This interface will allow you to configure the mail server details that ContentBox will use for sending email notifications
Site OptionsMail Server: This is the web address for the SMTP server. The address for the SMTP server may be an Internet address, such as mail.company.com, or the IP address of the mail server, such as 127.0.0.1.
If not specified, ContentBox will use the mail server address from the ColdFusion Administrator.
Mail Server Username: This is the username for the mail server, if necessary.
If not specified, ContentBox will use the username address from the ColdFusion Administrator.
Mail Server Password: This is the password for the mail server, if necessary.
If not specified, ContentBox will use the password from the ColdFusion Administrator.
Mail SMTP Port: This is the port number on which the mail server is running. This value will default to 25.
Use TLS: This enables/disables (default) the Transport Level Security (TLS) on the connection to the mail server.
Use SSL: This enables/disables (default) SSL encryption on the connection to the mail server.
After you have configured the mail server settings, you can click the Test Connection button to send a test email message to the email address associated with the current logged in user.
When running ContentBox in Development Mode:When running ContentBox in development mode, the mail server details are not utilized. Instead, all emails will be written to the file system logs for review. This prevents inadvertent emails from being sent during development.
The logs for every email sent will be located in:
[ContentBox Root Folder]\config\logs\mail
In developing your user interface, the majority of your time will be spent creating content in the admin and modifying files from within your custom theme, located in the [ContentBox Module Home]/themes directory.
With state-of-the art development tools like CommandBox to assist with scaffolding and dependency management and Coldbox Elixr, it's easy to build out your theme in a fraction of the time it might otherwise take.
A typical theme directory structure might be:
css
fonts
js
For more information on the theme directory structure and configuration options see .
In addition, many front-end focused modules and libraries are available on Forgebox and can be installed from the CLI and used immediately in your templates, widgets and views. For example, to install a Twitter feed widget for ContentBox, simply run box install ID=cbwidget-tweetfeed directory=widgets from your theme directory and it will automatically be available for use in the admin. You may browse the ever-growing list of Forgebox libraries and modules on or run forgebox help from within CommandBox to begin exploring the available options.
March 18, 2025
In this release, we're thrilled to unveil a series of significant enhancements and upgrades to ContentBox designed to elevate your experience and considerably improve system performance. Our team has focused on integrating the latest CommandBox migrations and ColdBox Core, which ensures that the core system continues to operate with maximum efficiency and stability. This upgrade is part of our ongoing commitment to maintaining a cutting-edge platform that meets the evolving needs of our users.
It is also now ready for new engines like BoxLang and Adobe 2025. Lucee 6 support is still not there yet due to several Lucee regressions we are trying to pinpoint and report.
These updates reflect our dedication to delivering a robust, reliable, secure content management system supporting your business goals and growth. We invite you to explore these new features and improvements as part of our continuous effort to bring you the best in content management solutions.
The source code for this book is hosted in GitHub: . You can freely contribute to it and submit pull requests. The contents of this book are copyright by and cannot be altered or reproduced without the author's consent. All content is provided "As-Is" and can be freely distributed.
The majority of code examples in this book are done in cfscript.
The majority of code generation and running of examples are done via CommandBox: The ColdFusion (CFML) CLI, Package Manager, REPL -
Lets add a widget into a page. In this example, we're going to insert a simple ContentBoxBadge Widget which has no parameters or arguments. We show you how to create this Widget in the Developing for ContentBox section of the documentation.
Lets browse in the admin to Content > Sitemap and click on a page. Find the location in the text you would like to add your widget, and click the Green ContentBox Widget icon ( circled below ).
Pick a Widget out of the list, you can filter the widgets, or select by category ( categories are defined in the Widget properties ).
Click anywhere on the Widget itself, and the Insert Widget Dialog will open like the screen below.
Luis Majano is a Computer Engineer, and published author that has been creating software since the year 2000. He was born in in the late 70s, during a period of economical instability and civil war. He lived in El Salvador until 1995 and then moved to Miami, Florida where he studied and completed his Bachelor of Science in Computer Engineering at .
He is the founder and CEO of , a consulting firm specializing in web development, ColdFusion (CFML), Java development, and all open-source professional services under the ColdBox, CommandBox, and ContentBox stack. He is the creator of ColdBox, ContentBox, WireBox, TestBox, LogBox, and anything “BOX”, and contributes to over 250 open-source projects. He has a passion for learning and mentoring developers so they can succeed with sustainable software practices and the usage and development of open-source software. You can read his blog at
A theme is composed of the following pieces
ThemeDirectory
Theme.cfc (The CFC that models and configures your theme implementation)
layouts (The folder that contains layouts in your theme)
You can declare settings for your Themes that ContentBox will manage for you. The form itself is built from the Theme.cfc file itself.
The value is an array of structures with the following keys:
name : The name of the setting (required), the setting is saved as cb_layoutname_settingName
defaultValue : The default value of the setting (required)
Let’s start with an easy sample
[Pages view] Create a New Page [Create Page] and name it “News Page” [title]. Inside the CKEditor [ckeditor window] type: “Welcome to my news!” and give it a heading [heading 2].
Click Create a New Widget and type “RSS” in the Quick Filter. Select the RSS Widget. You will see that it gives you an error because you need to fill out the required info for the widget. To do this, get the RSS link for your favorite news site and paste it in the feed URL field. If your link is valid, you should see a list of links display in the Widget Preview area.
Before clicking Insert Widget there are a few things you can modify. For example, maxItems allows you to select very easily how many items you want to be displayed. You can also use showBody
By default the includes directory of your theme is used to store your static assets.
Because these assets are called from your customized theme, however, you may use any directory conventions you prefer. If you plan to use customized paths or CDN links in your template, it's best to create a setting in your Theme.cfc which will then be configured through the admin.
In the Front End of the Website, the Theme takes over the rendering. To ensure all Assets are added correctly from various modules, for every theme, we recommend using the htmlHelper's
____ _ _ ____
/ ___|___ _ __ | |_ ___ _ __ | |_| __ ) _____ __
| | / _ \| '_ \| __/ _ \ '_ \| __| _ \ / _ \ \/ /
| |__| (_) | | | | || __/ | | | |_| |_) | (_) > <
\____\___/|_| |_|\__\___|_| |_|\__|____/ \___/_/\_\<major>.<minor>.<patch>'Welcome to the Dark Side - The Admin'pages.cfm (Mandatory layout used for all pages by convention)
maintenance.cfm (Optional used when in maintenance mode, else defaults to pages)
search.cfm (Optional used when doing searches, else defaults to pages)
views (The folder that contains views for rendering)
archives.cfm (MANDATORY: The view used to render out blog archives.)
entry.cfm (MANDATORY: The view used to render out a single blog entry with comments, etc.)
error.cfm (MANDATORY: The view used to display errors when they ocurr in your blog or pages)
index.cfm (MANDATORY: The view used to render out the home page where all blog entries are rendered)
notfound.cfm (The view used to display messages to users when a blog entry requested was not found in our system.)
page.cfm (MANDATORY: The view used to render out individual pages.)
maintenance.cfm (OPTIONAL: Used when in maintenance mode)
templates (The folder that contains optional templates for collection rendering that are used using the quick rendering methods in the CB Helper. See below for additional information)
category.cfm (The template used to display an iteration of entry categories using coldbox collection rendering)
comment.cfm (The template used to display an iteration of entry or page comments using coldbox collection rendering)
entry.cfm (The template used to display an iteration of entries in the home page using coldbox collection rendering)
widgets (A folder that can contain layout specific widgets which override core ContentBox widgets)
Now that you are done configuring the options that the RSS widget offers, click Insert Widget. You should now see a graphical representation of your widget within the CKEditor content editing area.
Hint You can configure your inserted widget anytime by double-clicking the widget content, or by choosing “Edit Widget” from the context menu
You can actually have a Quick Preview by clicking the EYE or typing the Keyboard shortcut: Ctrl + P. The Quick Preview allows you to see how the changes you have made to your page (like your new widget) are going to render on your site before publishing them.
addAsset()Since the SuperType ( which all ColdBox items inherit from ) implements addAsset() you can call it directly from almost any file in your application.
addAsset( "#prc.cbroot#/includes/css/#css#.css" );
You might have noticed, that even in the Admin Asset Management methods explained here, the actual implementation of the cssFullAppendList and cssAppendList use the addAsset to add the CSS to the head of the HTML page.
This applies to both CSS and JS. The main downside to this approach is that all assets added with addAsset are added to the head. The order of the assets is not strictly ( or easily ) controlled either.
We recommend using a similar approach to the admin, using an array, and outputting in the theme. We will be standardizing an approach soon, so all themes can easy implement these features, with a single line cbhelper method.

February 14, 2024
CONTENTBOX-1505 RenderView widget exception when using `view()` to render the view
CONTENTBOX-1506 Updated all server.jsons to use `env` for the ortus orm extension since the latest lucee build broken extensions via jvm args
CONTENTBOX-1507 BulkSave not accounting for sites when filtering and saving
Luis has a passion for Jesus, tennis, golf, volleyball, and anything electronic. Random Author Facts:
He played volleyball in the Salvadorean National Team at the tender age of 17
The Lord of the Rings and The Hobbit are his favorite books (Geek!)
His first ever computer was a Texas Instrument TI-86 that his parents gave him in 1986. After some time digesting his very first BASIC book, he had written his own tic-tac-toe game at the age of 9. (Extra geek!)
He has a geek love for circuits, microcontrollers, and overall embedded systems.
He has of late (during old age) become a fan of organic gardening.
Keep Jesus number one in your life and in your heart. I did and it changed my life from desolation, defeat and failure to an abundant life full of love, thankfulness, joy and overwhelming peace. As this world breathes failure and fear upon any life, Jesus brings power, love and a sound mind to everybody!
“Trust in the LORD with all your heart, and do not lean on your own understanding.” – Proverbs 3:5
Jorge is an Industrial and Systems Engineer born and raised in El Salvador. In 2004 he moved to Monterrey, Mexico to complete his Bachelor's studies at ITESM. In 2009, after graduating, he went back to his home country where he worked as Operations Manager for SIHAM, Industrias Bendek S.A. de C.V. from 2009 to 2012.
In 2012 he moved to Switzerland and married his beautiful wife Marta. In 2013 he joined Ortus Solutions as a Project Manager and currently serves as Ortus Business Manager.
He is passionate about delivering value to customers through the modernization of business processes, tools, and technologies, and has been part of the Ortus Modernize or Die movement since its inception.
He has been blessed with 3 children: Sofia, Isabella, and Jorge, and loves spending time with his family. He enjoys a nice kickboxing workout session and is a mountain-bike-weekend-warrior. On Sundays, he serves as a Worship Pastor at Iglesia Cristina Hispano-Suiza in Pratteln and rejoices in the Lord Jesus Christ.
Therefore, if anyone is in Christ, the new creation has come: The old has gone, the new is here! 2 Corinthians 5:17

# Run the update of the core dependencies
update --force# Run the migrations
run-script contentbox:migrate:upRecent Comments Count
Recent Logins Count
If you already have a ContentBox 6 installation, then follow this quick guide, which is mostly published here: https://contentbox.ortusbooks.com/getting-started/upgrading-contentbox
Make sure you back up your database and source, just in case.
Please open the installations box.json and identify the commandbox-migrationsdependency and make sure it is either a *or ^5.0.0.
Then please run the following command to make sure you are using the latest CommandBox migrations
Go to the webroot of your installation and go into the CommandBox shell by typing. box.
This will update ColdBox, ContentBox, and any of your project dependencies listed in your box.json. Once this is run, your source code has been updated. Let's move to the database.
Now that the ContentBox source has been upgraded, let's run the database migrations:
If the migrations run successfully, we have not fully updated to ContentBox 6.1. Startup your engines and enjoy!
The ContentBox team can also do the heavy lifting for you, as we are a professional open-source project. Just contact us, and we will update or install any ContentBox instances securely and quickly!
If you encounter any issues upgrading, please get in touch with us via our community discourse.
CONTENTBOX-1534 Upgrade to latest commandbox-migrations on core
CONTENTBOX-1517 fix deprecation warning on AuthValidator for CBSecurity Latest
CONTENTBOX-1526 bypass relocation creation if the slug is unchanged
CONTENTBOX-1530 Several performance updates dealing with large amounts of content and lazy relationships
CONTENTBOX-1531 Updated bot fight regex mode
CONTENTBOX-1533 Update all server files to latest standards
CONTENTBOX-1536 Update swagger to latest sdk
CONTENTBOX-1537 Update cbstorages config
CONTENTBOX-1538 Update memento responses to include snapshots and not full responses
CONTENTBOX-1504 ORM Extension is not installed when using contentbox CLI to create a new ContentBox site
CONTENTBOX-1511 Global HTML Saving a new version each time, rather than overwriting
CONTENTBOX-1512 RateLimiter has a memory leak
CONTENTBOX-1518 Remove Pretty Printing of JSON in BaseContent.getContent
CONTENTBOX-1524 index names have to be unique on Postgresql
CONTENTBOX-1525 fix query that was causing ConcurrentModificationException in relocationservice
CONTENTBOX-1527 add null empty include for expireDate for content objects or else it doesn't save
CONTENTBOX-1528 postgresql issues on migrations: Fix_postgres_quoted_columns
CONTENTBOX-1529 Parent ID on Menu items table should be nullable for top-level items.
CONTENTBOX-1532 cfmigrations missing correct DB_SCHEMA property for certain databases
CONTENTBOX-1535 html helper configuration not working on case sensitive linux
CONTENTBOX-1539 statusText removed in Jakarta specs
All ColdFusion examples designed to run on the open-source Lucee Platform or Adobe ColdFusion 11+
Flash, Flex, ColdFusion, and Adobe are registered trademarks and copyrights of Adobe Systems, Inc.
ColdBox, CommandBox, FORGEBOX, TestBox, ContentBox, Ortus Solutions are all trademarks and copyrights of Ortus Solutions, Corp.
The information in this book is distributed “as is”, without warranty. The author and Ortus Solutions, Corp shall not have any liability to any person or entity with respect to loss or damage caused or alleged to be caused directly or indirectly by the content of this training book, software, and resources described in it.
We highly encourage contribution to this book and our open-source software. The source code for this book can be found in our GitHub repository where you can submit pull requests.
10% of the proceeds of this book will go to charity to support orphaned kids in El Salvador - https://www.harvesting.org/. So please donate and purchase the printed version of this book, every book sold can help a child for almost 2 months.
Shalom Children’s Home (https://www.harvesting.org/) is one of the ministries that are dear to our hearts located in El Salvador. During the 12 years of civil war that ended in 1990, many children were left orphaned or abandoned by parents who fled El Salvador. The Benners saw the need to help these children and received 13 children in 1982. Little by little, more children came on their own, churches and the government brought children to them for care, and the Shalom Children’s Home was founded.
Shalom now cares for over 80 children in El Salvador, from newborns to 18 years old. They receive shelter, clothing, food, medical care, education, and life skills training in a Christian environment. The home is supported by a child sponsorship program.
We have personally supported Shalom for over 6 years now; it is a place of blessing for many children in El Salvador that either have no families or have been abandoned. This is a good earth to seed and plant.
To get to the Import Tools, in the admin, click on Tools > Import.
The Import Tools page displays 2 main options, ContentBox Package ( .cbox ) or Database Import. In Tip 10, we talked about importing from a ContentBox package, but in this tip, we are going to click Import from Database and then enter your database connection criteria to complete the import.
This server must have a defined datasource to the source blog database in order to import it. Please make sure this datasource exists in the ColdFusion administrator. If you have not done this yet, please login into your ColdFusion Administrator ( or Lucee admin ) and setup the datasource for the database you wish to import.
Enter the Datasource name that you created, and Username/ Password if required.
Next we have to choose the type of data you are importing, and any special setup you might have used. Select the Importer Source - Mango, WordPress, BlogCFC or MachBlog ( please let us know if your CMS is not on this list and would like us to enter it )
Table Prefix - when installing the blog, some blog software allow you to select a table prefix. To import your data correctly, we need to know what Prefix the database is using.
Default Author Password - Since systems encrypt passwords, we cannot simple copy them over, we need to create new ones. Please enter a default author password to set this as the default, and then you can modify them once they are imported into ContentBox.
Since Roles are not the same between blogs, please select the default Author Role you wish to use for Authors imported through this process. You can manually change them after the import.
When you are all set, click Start Import, and be patient. This process might take some time.
Note: We have worked hard to make sure this process is as smooth as possible. There may be some data that does not transfer over automatically, but this should give you a great starting point, if converting from another blog.
Remember, always back up your data and files before doing imports like this, to be sure… and never do this in production.
Insert Widget. Back to Widgets allows you to return to the Widget list to look for a different widget. Cancel returns you to the Content Editors.Once inserted, click Publish, and then you'll see a Widget placeholder like this.
If you right click on the widget, you can get a Widget Context menu like below. You can edit, or remove a Widget through that context menu, or just double click the Widget placeholder to edit directly.
This example has no arguments or parameters to change, but if you did, you would be able to edit those here, and click Update Widget to save those changes.
You can preview the page using our Responsive Previewer which allows you to see what your page will look like, in desktop, tablet and phone views ( horizontal and vertical ).
When you are happy, ensure you save / publish your page to keep your changes. Once saved, you can view it on the front end of the website.
required : Whether the setting is required or not. Defaults to false
type : The type of the HTML control (text=default, textarea, boolean, select, color)
label : The HTML label of the control (defaults to name)
title : The HTML title of the control (defaults to empty string)
options : The select box options. Can be a list or array of values or an array of name-value pair structures
optionsUDF : The select box options. This points to a UDF that returns a list or array of values or an array of name-value pair structures. Example: getColors not getColors()
group : lets you group inputs under a Group name - settings should be in order for groupings to work as expected
groupIntro : Lets you add a description for a group of fields
fieldDescription : Lets you add a description for an individual field
fieldHelp : Lets you add a chunk of HTML for a Modal, openable by the User by clicking on question mark next to the field label. Recommended use is to readFiles from the ./includes/help directory, with a helper function, for example: loadHelpFile( 'cbBootswatchTheme.html' );
Below is an annotated screenshot showing most of the visible elements generated in the Theme Settings Admin form from the Theme Settings configuration structure.
Turning this flag on will require two-factor authentication for your app. Any users who have not enrolled will be required to enroll on their next login. Keep in mind that if you as an admin are not enrolled in two-factor and this setting is turned on you will be forced to enroll in two factor after saving this configuration.
The number of days to keep trusting a user's device. If you set this value to 0, two factor authentication will be required on every log in.
Two factor authentication uses a provider system to allow new methods of two factor authentication to be provided via a module. A good example of this extension is Amazon SNS Provider.
Note that if you decide to change the default two factor provider, all currently enrolled users will be unenrolled.

ContentBox itself is a ColdBox application, with 3 special modules that do all of the hard work. Below you will see the shell of the ColdBox app, with the key folders expanded and bolded.
Although ContentBox has a large number of folders and files, most customization activities will be done in a few key locations. This should make navigating the ContentBox source files easier.
We recommend using modules for extending ContentBox. Modules are easy to install, and can be managed through the ContentBox admin, activating and deactivating as needed. Modules can contain widgets, interceptors, admin or front end menu items, including handlers and views.
Themes are self contained folders, within ContentBox's themes folder. Themes themselves are module like, with a few added features, which means you can include modules in your themes for truly deep and powerful themes.
Traditional ColdBox Modules can be installed outside of ContentBox's control and life-cycle with ColdBox's normal conventions.
Initial ContentBox Website Install
coldbox ( The ColdBox core, including system and ColdBox dependencies )
config ( The ColdBox app config folder )
handlers ( The ColdBox app handlers folder )
layouts ( The ColdBox app layouts folder )
models ( The ColdBox app layouts folder )
modules ( The ColdBox app layouts folder )
contentbox
content ( default location for the media manager - customizable through Admin settings )
modules_app ( Home for all of your custom ColdBox modules, outside of ContentBox's lifecycle )
views ( The ColdBox app layouts folder )
.htaccess
Application.cfc ( The main ColdBox Application.cfc )
box.json
favicon.ico
index.cfm
license.txt
readme.md
robots.txt
server.json
In System > Settings > Security Options - You will see 3 new features to ContentBox ( released in ContentBox 3.0 ), the Login Tracker, the Rate Limiter, and Secure Sockets Layer ( SSL ) Encryption.
The ContentBox administrator module now comes with a login tracker which if enabled can track invalid logins and be able to block individual ip addresses from brute-force attempts. We even track all valid logins into the new ContentBox Security Audit Log.
One of the biggest problems on the internet today, is out and out traffic overload. Of course, hardened hardware is the best approach to stop denial of service attacks, but we have given you some tools inside of ContentBox to help at the software level. You can now run your very own Rate Limiter.
SSL support can now be found everywhere in ContentBox for both the UI and admin modules. Users can even select specific pages for users to transition into or out of SSL for richer eCommerce or secure experiences.
Security is a big issue with any website these days, and with the number of WordPress hacks in the wild, it’s a big PRO to using ContentBox. With Brute force attacks to admins so prominent, we have a few features to make your life easier, and your website safer.
One of the major upgrades in ContentBox 3.0, ContentBox now offers BCrypt support for password encryption, to make cracking passwords harder than ever. The default algorithm for passwords is now based on BCrypt with work factors for better security and entropy. You can read more on bcrypt here:
A new password policy is now in place for ContentBox for new and current users, which must be greater than 8 characters with at least one:
Lower case character
Upper case character
Digit
Special character
All of these features are definitely great addons to ContentBox, but one of the best features of all...you can completely remove the Admin itself from your production site. This would give hackers no access to the login page at all.
Secure your site today.
To make Asset management easier in the Admin, we have provided a few arrays, that you can append your assets to. We have JS and CSS arrays, as well as convention based, and full path arrays.
We have two options for working with Javascript in the admin.
jsAppendList
This expects the name of the js file ( without the .js extension ) which is located in the ContentBox includes/js folder. This is a simple convention based approach, so you can easily just append a file, for example arrayAppend( jsAppendList, 'dragula' ) to load /includes/js/dragula.js
jsFullAppendList
This expects the full path of the js file ( including the .js extension ), including the location. This is useful, because you may be using grunt or gulp to compile files, store them in different locations, or actually link out to a CDN for some of your scripts.
For example:
arrayAppend( jsFullAppendList, '/includes/js/dragula.js' );
arrayAppend( jsFullAppendList, 'https://code.jquery.com/jquery-3.1.1.min.js' );
Inside of /modules/contentbox-admin/layouts/inc/HTMLBodyEnd.cfm you will see the following code.
We have two options for working with CSS in the admin.
cssAppendList
This expects the name of the CSS file ( without the .css extension ) which is located in the ContentBox includes/css folder. This is a simple convention based approach, so you can easily just append a file, for example arrayAppend( cssAppendList, 'dragula' ) to load /includes/css/dragula.css
cssFullAppendList
This expects the full path of the css file ( including the .css extension ), including the location. This is useful, because you may be using grunt or gulp to compile files, store them in different locations, or actually link out to a CDN for some of your scripts.
For example:
arrayAppend( cssFullAppendList, '/includes/css/dragula.css' );
arrayAppend( cssFullAppendList, 'https://maxcdn.bootstrapcdn.com/bootstrap/3.3.7/css/bootstrap.min.css' );
Inside of /modules/contentbox-admin/layouts/inc/HTMLHead.cfm you will see the following code.
Whether you have a website with a lot of traffic, or not, it pays to have a test / staging site setup to test out changes to your website. One of the biggest problems with having a staging and production website, is moving data from one environment into another. This need inspired the Content Import and Export features in ContentBox.
The Import and Export tools are located in the Admin menu under Tools.
From this panel you can choose to export your entire site or parts of it as a *.box archive package.
You have 2 options, Export everything, and Mr Picky, where you can pick and choose.
As you can see in the pick and choose, there are lots of options. Pages, Entries, Categories, ContentStore, Authors, Roles, Permissions, Security Rules, Settings and much more. This makes it easy to pick and choose the content you need to move.
When you are ready, you can click Export Preview to see exactly what will be exported ( see below ).
Once you are happy with your selection, click Start Export
Once complete, you will be prompted to save your cbox file.
Once you have exported your content into a cbox file, you can import it to the installation of your choice, through Tools > Import
When installing a CMS, one of the first steps you would normally take, is install a theme. We wanted to give you a head-start and give you a theme that gives you plenty of options to customize your site, colors, social media icons, and even a hero style homepage. In ContentBox 3.1 we even updated Themes to have better documentation, so it's easier to get started with your theme. Let's see what the default theme can do for you.
Theme settings is where all of your configuration happens. In ContentBox 3 we added a lot of functionality to make the Theme Settings easier to work with, for Devs and Users. The first you will see if the groupings of settings. This allows a User to focus on one set of settings at a time. With a complex theme, having all of the settings visible at once can be very overwhelming.
The roles menu is located under the User menu in the navigation bar to the left of the screen.
In this menu you will see a list of roles available to assign users, which will allow you to define their access to the site. You can use the quick search function if you are looking for specific roles, otherwise you can look in the main body of the page.
You will see 5 headings across the page
Role - This will be the name given to the role
Content categories can be edited in the administrator, located under the left hand menu 'Content'.
Each post ( Page or Blog ) can be filed under zero, one or many categories. Categorization helps group content and gives users more options for navigating your content.
Links to your categories of blog posts show up in the right hand menu of your blog layout (theme implementation may vary), and show up as 'Tags' for your blog entry.
The category manager is simple, including a simple search, listing Categories with their associated slug, and a list of pages and entries currently associated with this category, and options to 'Edit' or 'Delete'.
You can perform Bulk actions using the checkboxs next to Category Name, and clicking 'Bulk Action', which allows you to perform one of the following tasks:
Delete Selected
On this menu you will have the following options to change:
Site Name: This is the global name of this ContentBox website. This is the name that will display in the browser and what will normally show up in search engines. In the default Theme, this is the Header for the site ( unless you select a logo image ).
Site Tag Line: This is a slogan, motto, your USP Unique Selling Proposition, or short catchy 10 second elevator pitch. This is commonly used as a Alt tag for Logos by themes, each theme varies.
Blog posts should be scheduled for daily at 7am PST to ensure better readability.
All Blog posts should be included with an image.
Images should be 800x200.
Ensure all posts have their own SEO content."dependencies":{
...
"commandbox-migrations":"^5.0.0"
...
}box install commandbox-migrations --force# Update the core dependencies
update --force# Run the migrations
run-script contentbox:migrate:upthis.settings = [
{ name="Title", defaultValue="My Awesome Title", required="true", type="text", label="Title:" },
{ name="Colors", defaultValue="blue", required="false", type="select", label="Color:", options="red,blue,orange,gray" }
];i18n ( i18N properties files for DE, US, SV, IT, BR currently )
models ( Core ContentBox Models and Services )
modules ( Modules here are always loaded no matter what. These are core sub-modules of the ContentBox core module )
modules_user ( ContentBox life-cycle controlled modules. Manually installed or downloaded from Forgebox. These Modules can be activated and deactivated through the admin )
Hello ( Hello World Sample Module )
themes ( ContentBox Themes, manually installed or downloaded from Forgebox )
default ( Default ContentBox Theme )
tmp
updates ( Location for downloaded and manually installed patches )
widgets ( Default ContentBox Widgets - Override-able )
Application.cfc
ModuleConfig.cfc
contentbox-admin ( ContentBox Admin - removable for security reasons )
contentbox-ui ( Contentbox UI Module )


<cfloop list="#event.getValue( "jsAppendList", "", true )#" index="js">
<script src="#prc.cbroot#/includes/js/#js#.js"></script>
</cfloop>
<cfloop list="#event.getValue( "jsFullAppendList", "", true )#" index="js">
<script src="#js#"></script>
</cfloop><cfloop list="#event.getValue( "cssAppendList", "", true )#" index="css">
<cfset addAsset( "#prc.cbroot#/includes/css/#css#.css" )>
</cfloop>
<cfloop list="#event.getValue( "cssFullAppendList", "", true )#" index="css">
<cfset addAsset( "#css#" )>
</cfloop>JDK 11+
A clean, empty directory on your machine
You can download CommandBox from the official site: http://www.ortussolutions.com/products/commandbox#download and install it in your preferred Operating System (Windows, Mac, Unix).
Once you download and expand CommandBox, you will have the box.exe or box binary, which you can place in your Windows Path or *Unix /usr/bin folder to have it available system-wide. Then open the binary, and CommandBox will unpack itself in your user's directory: {User}/.CommandBox. This happens only once; the next thing you know, you are in the CommandBox interactive shell!
We can execute a-la-carte commands from our command line or go into the interactive shell for multiple commands. We recommend the faster interactive shell, which can remain open in your project root.
The first step in our adventure is to install the contentbox-cli package that will handle the installation, scaffolding, and management of ContentBox sites.
Once installed, you can always run contentbox help to get the list of available commands and help information.
Create a database in your RDBMS of choice. Ensure you note the name of the database, the connection details, and its credentials. You will need them in the next step.
If you are using MySQL, make sure you use utf8mb4 for your database collation.
Now that we have our CLI installed create a new directory where we will create our site.
The wizard will take you by the hand and ask you all the relevant questions about your installation:
Name of your site
Which CFML Engine you want to run it on (Lucee5, Adobe 2018+)
Password of the CFML engine administrator
Password for the ColdBox HMVC Reinits
Database of choice (MySQL5+, MSSQL, PostgreSQL, Oracle)
Database credentials
Development or production site
Latest ContentBox version, specific or be bleeding edge
Confirm your settings, and the installer will configure the entire site, including ORM dialects, environment variables, etc. The installer will also connect to your database and run the creation migrations to seed the database.
It can optionally start your server of choice.
Tip: You can use the `install --help` command and see how to install ContentBox in an automated fashion without user interaction.
The web installer will then add your first administrator user, email configurations, and production and development site in one box. Once you follow the wizard, ContentBox is up and running! Enjoy!
You can use the CommandBox commands to interact with the embedded server:
server stop to stop the server
server start to start the server
server restart to restart the server
server log to view the log files
server help to get help on your server commands
You now have a fully functional ContentBox installation with two sites: development and production. You can now start creating your content, themes, modules, and more.
Since each theme controls their own settings, lets look through the Default Theme's settings.
When you expand your group, you will see all of the settings of that group, displayed with a Group Introduction, a label for each setting, optional setting description ( not shown in the example below ) and an optional help modal ( the blue ? Icon below ) . In colors, you can choose one of many Bootswatch themes. Bootswatch is a set of color swatches made to extend the traditional Bootstrap framework. Below you will see a selection of the swatches.
Here is an example of an optional help modal, for settings that require more information for the user.
Changing the color dramatically changes your sites appearance. Lets look at your site default ( green ) and some options.
Of course you have plenty of options, visit bootswatch.com for thumbnails and more information on each swatch.
Logo URL:
You can choose whether you would like to use Text for your Logo, like the screenshots above, or you can choose to use a logo. One important thing to note here is the size is not restricted, please ensure your resize your logo.
Show Search form field in Header.
Not a fan of the large search box, change your selection here to hide it.
The footer is just a text field, so you can add some copy to your footer. I decided to spice things up with Bacon, here is a footer with Bacon Ipsum.
The home page has lot of options, as you can see in the screenshot below. You can change the header title, add some text, give text for the button and add the link that the button links to, as well as selecting a preselected background image, or your own custom background.
After changing a few settings, your homepage now has a nice hero image, like the screenshot below.
When looking at the blog part of ContentBox, you'll see you have loads of options on the right hand side.
This might be too much for some sites, so you can choose whether to show / hide some of those mini widgets.
Turn them off, and hey presto, no more side bar mini widgets.
This is just the default theme. We have many more, and others are being developed, and can be shared easily through Forgebox.
Permissions - This will tell you how many permissions have been assigned to the role.
Authors - This will tell you how many users are assigned to this role
Actions - There are 2 options:
Green Icon - Manage the Permissions
Blue icon - Role Actions has 3 options
Edit Role
Export as JSON
Export as XML.
*You can only edit permissions if you yourself have permission to make changes.
You can create new roles by selecting Create Role. A box will appear and you enter the Name and Description. Once this is done you can add abilities to the new role by managing the permissions (see below).
Edit Role only allows you to edit the Name and Description, like the Create Role Form. You will spend more of your time with Roles, managing the Permissions.
In the Manage Permission menu it will show the Available Permissions & Active Role Permissions.
Available Permissions are shown in a dropdown box. You will be able to add permissions to a role by selecting the permission and clicking Add Permission.
In the Active Role Permissions below are the permissions that are currently available to this role. You can also remove permissions available to the role by click the red X next to the permission in the active role section.
In the top right section of the page, you will see a Bulk Actions button next to Create Role. This allows you to do the following:
Import
Export All as JSON
Export All as XML
This is a nice feature when you manage several sites. You can setup roles on one site, and then export them, and import them into the other sites you manage.
For safety reasons, when you Import Roles, by default you will not override any content. If you have existing roles, that you want to be updated, please set Override Content to true. Otherwise existing content will be skipped during the import process.
Exporting to JSON or XML is a simple process. Click Bulk Actions and select your format, and in seconds you will see a file download prompt pop up, asking you to open or save your file ( in most browsers ).
Import
Export All as JSON
Export All as XML
To add a new category, click the green button labeled 'Create Category' in the top right hand corner of the category manager. Clicking the 'Create Category' button pops a modal window up like below, asking for category name, and slug.
Category Name This is the name of the category, displayed wherever the category is used.
Slug The category slug is the unique id refereneced throughout the site, including the URL. If you leave the slug blank, the system will generate a slug for you, for example: If your category is called 'Recipes', the generated slug would be 'recipes' and the url would be http://www.yoursite.com/blog/recipes In some cases, you would prefer a slug different from the auto generated slug, for example: If you category is called 'Tasty Recipes', instead of 'tasty-recipes' for a slug, you could use 'recipes' or 'food' and the url would use the slug of your choice, so the url would be http://www.yoursite.com/blog/food
Save Category Once you have entered your category information, click 'Save Category' to save the category, and return to the Category list.
Cancel - Close Modal Clicking the X (close) or 'Cancel' button will cancel the creation of the new category.
To edit a category, click the name of the category from the category list, or click the green edit icon.
Update the category name, and slug as needed, and click 'Save Category' when you are happy with the changes. Closing or Canceling will revert your changes to the last saved version.
Note: The Category Slug is an important part of the url creation, so changing the slug will affect your existing links.
Deleting a category is a simple action, but can have a lot more impact that you might initially think. A category slug is used to create urls, and removing a category will render all those previous url links invalid. Deleting a category does not remove the content that belongs to that category, but does remove one of the ways to view that for your user.
You can delete a category, one at a time, using the red delete (trash can) icon button on the line of the category you wish to delete.
If you wish to delete multiple categories at once, you can select the check boxes next to the categories you wish to delete, and click the 'Bulk Actions' button, and select 'Delete Categories' from the drop down menu.
When you delete a category that has associated content, pages or entries, the category is deleted, and the association is deleted, but the original page / entry is not deleted.
For convenience, ContentBox has easy import and export options for your categories. To export all of your categories, simply click 'Bulk Actions' and select 'Export All as JSON' or 'Export All as XML'. Your browser will prompt you to download the Categories.json or Categories.xml, depending on the option you chose.
The JSON/XML includes just the 3 base fields, category, slug, and categoryID, as shown below in a json example.
Site Keywords: A comma delimited list of keywords to be used in the HTML keywords meta tags. This helps the search engine identify what your site contains. You can override this in blog posts, pages, and in modules.
Home Page Displays: This enables you to choose the latest blog entries page or an existing ContentBox page to display as the homepage for the website.
Send ContentBox Identity Header: This allows you to enable or disable a Browser Header, to help tools and browsers to identify the software powering the website. This is hidden from users.
Settings Cache Provider: Choose the CacheBox provider to cache global site settings into.
Disable Blog: You can disable the Blog for the entire ContentBox website. This does not delete data, it just disables blog features... including the addition of a Menu Item called Blog if you are using the default page navigation.
Note: If you disable the blog, remember to change the Home Page Display above to a real page and not the blog listing if you are disabling the blog.
Blog Entry Point: Choose the entry point in the URL to trigger the blog engine. The usual defautl entry point pattern is blog. Do not use symbols or slashes (/ )
Site Maintenance: You can put your entire site in maintenance mode if you are doing upgrades. This will make it easier to work on major changes to the site without customers seeing half completed work. The site will display a Offline Message, set in the Offline Message field, unless the Theme has a custom Maintenance Layout or Maintenance View.
Offline Message: The message to show users once the site is in maintenance mode, HTML is ok.
If you are logged in, with the MAINTENANCE_MODE_VIEWER permission, you will be able to view the site even when the site is in Maintenance Mode. When the site is in Maintenance Mode, you will see a Red Maintenance banner, to remind you the site is in Maintenance for other users.


The best way to contribute to ContentBox
Hola amigo! I'm excited that you are interested in contributing to ContentBox CMS. Before submitting your contribution, please make sure to take a moment and read through the following guidelines:
This project is open source, and as such, the maintainers give their free time to build and maintain the source code held within. They make the code freely available, hoping it will be useful to other developers and/or businesses. Please be considerate towards maintainers when raising issues or presenting pull requests. We all follow the Golden Rule: Do to others as you want them to do to you.
As contributors and maintainers of this project, we pledge to respect all people who contribute through reporting issues, posting feature requests, updating documentation, submitting pull requests or patches, and other activities.
Participants will be tolerant of opposing views.
Examples of unacceptable behavior by participants include the use of sexual language or imagery, derogatory comments or personal attacks, trolling, public or private harassment, insults, or other unprofessional conduct.
Project maintainers are responsible for removing, editing, or rejecting comments, commits, code, wiki edits, issues, and other contributions not aligned with this Code of Conduct. Project maintainers who do not follow the Code of Conduct may be removed from the project team.
When interpreting the words and actions of others, participants should always assume good intentions. Emotions cannot be derived from textual representations.
Instances of abusive, harassing, or otherwise unacceptable behavior may be reported by opening an issue or contacting one or more project maintainers.
Please make sure also that if you submit a pull request, you link it to the appropriate issue.
ContentBox :
ColdBox Core :
If you file a bug report, your issue should contain a title, a clear description of the issue, a way to replicate the issue, and any support files that we might need to replicate your issue. The goal of a bug report is to make it easy for yourself - and others - to replicate the bug and develop a fix for it. All issues that do not contain a way to replicate will not be addressed.
If you have any questions on usage, professional support or just ideas to bounche of the maintainers, please do not create an issue. Leverage our support channels first.
Ortus Community Discourse:
Box Slack Team:
Professional Support:
The master branch is just a snapshot of the latest stable release. All development should be done in dedicated branches. Do not submit PRs against the master branch. They will be closed.
All pull requests should be sent against the development branch or the release branch for LTS
Having multiple small commits as you work on the PR is OK - GitHub will automatically squash it before merging.
If you discover a security vulnerability, please email the development team at and report it to the #security channel in our Box Team Slack Channel. All security vulnerabilities will be promptly addressed.
We have added all the necessary information for you to develop on ContentBox in our readme collaboration area and our UI Developer Docs so you can setup for UI development.
Please make sure your code runs on the following CFML Engines:
Lucee 5+
Adobe ColdFusion 2018+
We are big on coding styles and have included a .cfformat.json in the root of the project so that you can run the formatting tools and CommandBox scripts:
We recommend that anytime you hack on the core, you start the formatter watcher (box run-script format:watch). This will monitor your changes and auto-format your code for you.
You can also see the Ortus Coding Standards you must follow here:
All CFCs are self-documenting, and we leverage to document the entire software. All functions must be properly documented using the DocBox syntax:
You can support ColdBox and all of our Open Source initiatives at Ortus Solutions by becoming a Patreon. You can also get lots of goodies and services depending on the level of contributions.
Thank you to all the people who have already contributed to ContentBox! We ❤️ ❤️ ❤️ love you!
Made with
UDF ( User Defined Functions ) are a great way to add more power to your theme, and your theme settings.
Below are some common UDFs you might want to use in your themes, or templates on how you could create some of your own.
This is a useful method for standardizing loads HTML for the fieldHelp Modal. The fieldHelp setting using this function would look like this
loadHelpFile( 'cbBootswatchTheme.html' );
Since the helpFilePath is not passed in this example, it defaults to the Theme's includes/help/ folder.
Note: One concern when using this is relative pathing of assets, since the modal is generated in one folder, and the includes are in another folder.
This function gives you an array of Media Manager folders, so you could use in a optionsUDF setting, to allow the Theme Settings form to display a dropdown box with a list of folders. This would be great for a slide show, where the users select the folder, and all of the contents of the folder could be shown in the slideshow.
Bootstrap has a set of pre-defined styles, used in alerts, buttons, and many other styles you can use in your website. Having a UDF like this, allows you to create a setting that the User can select the button style type.
We use BootSwatch in several Themes, because it gives the user of the theme a lot of complete styles, in one theme. This UDF shows you how you can return a list as an array, so a user could select the BootSwatch they would like to use.
ContentBox v6.x is a major version update and will require the following instructions to update your v5.x installations. Please follow this guide or contact us at [email protected] so we can assist you during your upgrade process.
If you are in version 4.x then you will need to upgrade to version 5.x before upgrading to the 6.x series
All Upgrades to ContentBox should be done with the assistance of So ensure you have CommandBox installed on the server/machine you will be upgrading.
Once you have CommandBox installed, let's make sure we have some global dependencies installed so CommandBox can work with ContentBox automated upgrades:
This will install the module and the module that will be used to provide upgrades in the future. This is only done once. ContentBox 5 already ships with these dependencies once you install it.
Please make sure you backup your source code and your database. We are not liable for broken installations.
Make sure the database, the tables and columns are using utf8mb4 if you are using MySQLx
If you are using MySQL you will need to make sure your database and your tables are all using the following character set: utf8mb4 and NOT just utf8. ContentBox 5 requires the charset to be utf8mb4.
We also suggest you use the utf8mb4_general_ci collation for your database, tables and columns as well.
We have prepared a CommandBox task to upgrade your installation in one easy execution. This will upgrade your files and run the database migrations for you.
If you are in a Linux or Mac environment, you can execute the task using the following shell commands from the root directory of your application.
If you are in Windows, download the following task:
and place it at the root of your project. Then, issue the following CommandBox shell command to execute it.
The updater will update your installation and run the migration scripts. However, it will also override the following files:
It will create .bak files for the originals so you can manually merge in any changes you had before.
Once you do, go ahead and start up the engines! You are upgraded!
If you have developed themes, modules, models, or any type of extension based on ContentBox 5, you will most likely have to update your code to match the new interfaces, methods, and approaches. Especially since ContentBox 6 runs on ColdBox 7.

Deploy ContentBox into any Adobe or Lucee CFML Engine
install contentbox-cli# Create a new directory and go into it.
mkdir mysite --cd
# Run the installer wizard
contentbox install-wizard[{"category":"Homepage Rows", "categoryID":2, "slug":"homepage-rows"},{"category":"Slider","categoryID":1,"slug":"slider"}]#cb#The cb object contains a variety of common methods for retrieving ContentBox content and settings. Below are some common methods used to retrieve and create HTML content:
cb.siteName(): retrieves the configured name of Contentbox installation
cb.siteTagline(): retrieves the configured tagline for the ContentBox installation
cb.siteDescription(): retrieves the configured description for the Contentbox installation
cb.siteKeywords(): retrieves the configured global keywords
cb.siteEmail(): retrieves the default site email
cb.siteOutgoingEmail(): retreives the configured email used in outbound deliveries
cb.quickView( viewTemplate ): Renders a view partial located in the [theme home]/views directory. A .cfm file extension is not required.
cb.mainView( args ): Renders the main view for the handler action. A struct containing the args necessary for view rendering should be passed in. By default, this struct is available in your layout and is also named args.
cb.getCurrentEntries():
cb.getCurrentEntriesCount():
cb.getCurrentCategories():
cb.getCurrentPage():
cb.getCurrentComments(): Returns the published comments for the current entry
cb.getCurrentCommentsCount(): Returns the count of published comments for the current entry
cb.getCurrentRelatedContent(): Returns an array of content related to the active post or entry
cb.getCurrentCustomFields(): Returns a structure of custom fields for the active post or entry
cb.getCustomField( string fieldName, any defaultValue ): Returns the value of a custom field for the active post or entry
cb.contentStore( string slug ): retrieves the HTML output of a Content Store item by its slug
cb.contentStoreObject( string slug ): retrieves the associated Content Store object
cb.widget( string widgetName, struct args ): executes a named widget's renderit method and returns the HTML. A structure of arguments may be passed.
cb.getWidget( string widgetName ): retreives the associated [widget][2] object
cb.themeSetting( string settingName, any defaultValue ): retrieves a theme setting by name. A default value may be specified
cb.isCommentsEnabled(): returns a true|false value of whether site comments are enabled and if the current entry accepts comments
cb.quickSearchForm(): returns the HTML of a standard ContentBox Search Form according to the SearchForm widget
cb.getSearchResults(): returns an array of results for an active search
cb.linkAdmin(): creates a link to the ContentBox admin
cb.linkAdminLogin(): creates a link to the ContentBox administration login form
cb.linkAdminLogout(): creates a link to logout of ContentBox administration
cb.linkBlog(): creates a link to the site's blog
cb.linksSelf(): creates a link to the current page
cb.linkPageRSS( any categoryFilter): creates a link to the RSS feed applicable to the active request
cb.linkSiteRSS( any categoryFilter ): creates a link to the site's RSS feed
cb.linkCategory( string categorySlug ): creates a link to a specific category page
cb.quickCategoryLinks( string categorySlug ): creates an HTML unordered list of category links
cb.themeRoot(): returns the location of your currently defined theme in the application, great for assets, cfincludes, etc
cb.siteRoot(): returns the site root location using your configured module's entry point
cb.siteBaseURL(): returns the site's SES base URL
cb.adminRoot(): returns the root location of the admin using your configured module's entry point
widgetRoot(): returns the location of your widgets, great for assets and includes
A number of built-in interception points are avaialble within the ContentBox request, which may be run using the cb.event() method. For examples of how these are used, see the default theme layout files. Examples include:
cb.event( "cbui_beforeHeadEnd" )
cb.event( "cbui_afterBodyStart" )
cb.event( "cbui_afterContent" )
cb.event( "cbui_beforeBodyEnd" )
cb.themeName(): returns the currently active theme name
cb.layoutName(): returns the currently active layout name
cb.isPrintFormat(): returns true if you are in printing or exporting format
Easily Render Captcha Images - ContentBox supports native captcha support and now your themes can render out a nice captcha image by using the new ContentBox helper method:
cb.renderCaptcha() method.
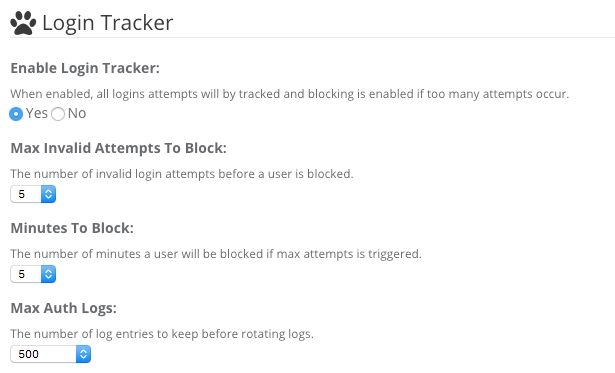


April 23, 2024
CONTENTBOX-1513 Updating to ortus orm extension latest
CONTENTBOX-1510 Use of encodeForHTML on email in Comment Form breaks Comment functionality


/**
* loadHelpFile - helper function for loading html help into a variable for modal
* @helpFileName - the name of the file to read and return
* @helpFilePath - the relative directory for the help files. Defaulting to ./includes/help/ inside the theme.
* @return the contents of the file or empty string if the file does not exist
*/
function loadHelpFile( required string helpFileName, string helpFilePath='./includes/help/' ){
try {
return fileRead( arguments.helpFilePath & arguments.helpFileName );
} catch( any e ){
return '';
}
}function selectMediaManagerFolder(){
var event = getRequestContext();
var cbSettings = event.getValue(name="cbSettings",private=true);
var defaultDir = expandPath( cbSettings.cb_media_directoryRoot );
var allDirectories = directoryList( path=defaultDir, recurse=true, listInfo="query" );
var result = [];
for( var directory in allDirectories ){
if ( directory.type is 'dir' ){
var theString = replaceNoCase( directory.directory, defaultDir, "", "all" ) & '/' & directory.name;
theString = replaceNoCase( theString, "\", "/", "all");
theString = replaceNoCase( theString, "//", "/", "all");
result = result.append( theString );
}
}
return result;
}array function getBootstrapStyles(){
return [
"default",
"primary",
"success",
"info",
"warning",
"danger"
];
}/**
* Build the swatches options
*/
array function getBootSwatches(){
return listToArray( "cerulean,cosmo,cyborg,darkly,flatly,green,journal,lumen,paper,readable,sandstone,simplex,slate,spacelab,superhero,united,yeti" );
}# install env controls and db migrations
box install commandbox-dotenv,commandbox-migrations --force# Download the updater
curl -o Updater.cfc https://raw.githubusercontent.com/Ortus-Solutions/ContentBox/master/build/patches/6.0.0/Updater.cfc
# Execute the task
box task run Updater.cfc
# Clean it up
rm Updater.cfc# Run the task
box task run Updater.cfc
# Clean it up
rm Updater.cfcApplication.cfc
readme.md
config/CacheBox.cfc
config/Coldbox.cfcMake sure all local tests pass before submitting the merge.
Please make sure all your pull requests have companion tests.
Please link the Jira issue in your PR title when sending the final PR
CommandBox is a ColdFusion (CFML) Command Line Interface (CLI), REPL, Package Manager and Embedded Server. We will leverage the CLI in CommandBox to install, deploy and configure ContentBox.
MacOS, Windows or Linux
JDK 11+
A clean, empty directory on your machine
You can download CommandBox from the official site: http://www.ortussolutions.com/products/commandbox#download and install it in your preferred Operating System (Windows, Mac, Unix).
Once you download and expand CommandBox, you will have the box.exe or box binary, which you can place in your Windows Path or *Unix /usr/bin folder to have it available system-wide. Then open the binary, and CommandBox will unpack itself in your user's directory: {User}/.CommandBox. This happens only once, and the next thing you know, you are in the CommandBox interactive shell!
We can execute a-la-carte commands from our command line or go into the interactive shell for multiple commands. We recommend the interactive shell, which is faster and can remain open in your project root.
We can now install the contentbox-cli package:
Once installed, you can always run contentbox help to get the list of available commands and help information. This will generate a .env file in your webroot. Please make sure you protect it from downloading. As ContentBox uses it for seeding secrets.
Create a database in your RDBMS of choice. Ensure you note the name of the database, the connection details, and its credentials.
If you are using MySQL, make sure you use utf8mb4 for your database collation.
Now go to your CFML engine administrator and register the contentbox datasource that points to the database you just created.
You can use ANY name for the datasource, but we will use contentbox for ease of use.
Now that we have our CLI installed and database and datasource created, we will create a new directory to create our site and run the ContentBox installer. This folder will likely be your web root in your CFML engine installation or a sub-folder within that web root. Let's assume it's the web root of your current CFML Engine installation.
The wizard will take you by the hand and ask you all the relevant questions about your installation:
Name of your site
Which CFML Engine you will be running ContentBox on (Lucee5, Adobe 2018+)
Password for the ColdBox HMVC Reinits
Database of choice (MySQL5+, MSSQL, PostgreSQL, Oracle)
Database credentials
Development or production site
Latest ContentBox version, specific or be bleeding edge
Deploy a CommandBox server or not. This should be false, as we only deploy our code to the CFML engine we have installed.
Confirm your settings, and the installer will configure the entire site, including ORM dialects, environment variables, etc. It will also run the migrations to build the database according to the credentials you pass and create a .env file in the root.
Tip: You can use the `install --help` command and see how to install ContentBox in an automated fashion without user interaction.
Now that we have installed ContentBox on disk and configured your CLI to connect to your database for delivering database migrations, we can finalize the installation via the web installer. Now open the installer by navigating to the root of the project. Let's assume you are running your CFML engine on port 8500:
Then you can finalize the web portions:
Administrator Account
Site Information
Notification Emails
Email Information
URL Rewriting
Enjoy your ContentBox installation!
Caution: After installing ContentBox, we recommend removing the installer and data source wizard modules from the disk. You can do so manually or via the Dashboard once you log in. {Root}/modules/contentbox-installer and {Root}/modules/contentbox-dsncreator
Refresh Listing - Refreshes the current folder location
Go Home - Return to the Home ( Root ) directory of the current library
Create Folder - Create a new folder in the current location
Rename - Rename the currently selected File or Folder
Delete - Delete the currently selected File or Folder
Upload - Brings up the Upload form, to allow you to select a file to upload. Remember, Media Manager also allows HTML5 styled uploading, so you can drag file(s) into the media manager to upload them. Folder Uploading is not supported in this version, but will be added in an upcoming update.
Download - Download the currently selected file.
Quick View - Preview the currently selected image in a modal window. Only supports Images.
File Listing - This shows the current folder in File Listing / Details view. This is the default listing style, shown in the screenshot above.
Grid Listing - This shows the current folder in Grid Listing / Thumbnails view. This is a great way to preview directories of images. This view can seen in the screenshot below.
Context Menus ( otherwise known as right click menus ) are available for Files and Folders. Files have the following context menu items
Folders have the following context menu items
The Status Bar has useful quick view information.
Full file path breadcrumbs
Filename, File Size, and last modified date-time stamp.
Next to the Module Name - 'Media Manager' you will see Content in a yellow label. That is the current Library you are looking at. There are several Libraries available for you to choose. To switch library, click the drop down select labelled Switch Library in the top right like the image below.
Depending on your security settings, you will be able to directly browse, upload, rename and delete filtes from the Content, Modules, Updates and Widgets locations.
There are a lot of configurable options for the Media Manager, to fit in with your use cases. Media Manager Settings are found in the administrator under System > Settings > Media Manager
The relative path or ColdFusion mapping in your server that will be the expanded root of your media manager. The default is modules/contentbox/content. This is restricted to relative paths to ensure the user of the Media Manager cannot access content outside of the web root. If you would like to use a folder outside of the web root, please create a coldfusion mapping ( and web accessible mapping if required by the Media Provider ) to ensure the folder is relative to the web root.
Media providers are used to deliver your media files securely and with greater flexibility as you can place your entire media root outside of the webroot.
This provider uses the ColdFusion cfcontent tag to deliver and stream files securely to the user. This uses a ContentBox route __media, that translates the path into a cfcontent call and delivers the content.
This provider will forward to the real physical location in the server for the media path requested via the internal servlet page context, so no real media path URL will be shown to the user. Use only if the media root is web accessible and a relative web root path, so double check your media root.
This provider will relocate to the real physical location in the server for the media path requested. Use only if the media root is web accessible, so double check your media root.
If enabled, the media provider system will issue caching headers for all assets. You can use the cbcache=true URL param to issue no caching headers on any asset.
Default: true
File Browser options includes a series of user options ( Yes / No ):
Allow Creation
Allow Deletes
Allow Downloads
Allow Uploads
Size Limit - Maximum size of the file upload in mb - defaults to 100mb
Max Similtaneous Uploads - Number of uploads allowed at the same time - defaults to 25
When using the Quick View for images, images are shown in a modal window, with a maximum width defined by this setting.


ContentBox sports its very own ContentBox Docker image. As with the CommandBox image, the [major].[minor].[patch] versioning mirrors the upstream product version, so it's easy to pull deploy a specific version, should your application require it.
The image is packaged with a self-contained express version, which uses an in-memory H2 database. To stand up an image using an un-configured express edition, simply run:
A new container will be spun up from the image and, upon opening your browser to http://[docker machine ip]:8080, you will be directed to configure your installation using the ContentBox Installer. That easy! Boom!
The ContentBox image is based on the so all features and environment variables are applicable. Please refer to that documentation as well:
The above run command produces an image which is self-contained, and would be destroyed when the container is stopped. If we wanted to run a version in production, we would need to persist, at the very minimum, the database and your custom assets (widgets, modules, themes, and media library). In order to do this, we need to mount those resources into the Docker host file system.
By convention, the express H2 database is stored at /data/contentbox/db inside the container. In addition, the custom content module which contains your custom themes, widgets, modules, and media library are stored under /app/modules_app/contentbox-custom.
In 3.x versions the default storage location for the CMS user media assets was set to /app/includes/shared/media and the contentbox-custom module did not exist.
Let's mount both of those volume points so that our database and user assets persists between restarts:
Now, once our image is up, we can walk through the initial configuration. Once the configuration is complete, simply stop the container and then start it without the environment variable INSTALL in place. The H2 database and uploads will be persisted and the installer will be removed automatically on container start.
INSTALL Setting CaveatsPlease remember that the INSTALL environment variable is ONLY used to go through the ContentBox installer wizard. Once the database is seeded with the installation process, you will no longer use it unless you want to reconfigure the installation.
If you would like to connect your container to an external database system, you can very easily do so, which would allow us to connect from multiple containers in a distributed fashion (MySQL, Oracle, MSSQL, etc). If not, you run the risk of file locks if multiple container replicas are sharing the same H2 database.
Tip: We would suggest you use the H2 database or EXPRESS edition when using only 1 replica.
The image is configured to allow all ORM-supported JDBC drivers to be configured by specifying the environment variables to connect. Alternately, you may specify a environment variable which points to a file containing your engine configuration, including data sources.
To programmatically configure the database on container start, environment variables that represent your datasource configuration should be provided. There are two patterns supported:
DB_DRIVER configuration - which may be used for Adobe Coldfusion servers
DB_CLASS configuration - which configures a datasource by JDBC driver and connection string (Both Adobe and Lucee)
An example container run command, configuring a MySQL database would be executed like so:
To use the DB_DRIVER syntax for Adobe Coldfusion, an example run command would be:
As you can see, these commands can become quite long. As such, using or may provide a more manageable alternative.
A number of environment variables, specific to the ContentBox image, are available for use. They include:
EXPRESS=true - Uses an H2, in-memory database. Useful for very small sites or for testing the image. See
INSTALL=true (alias: INSTALLER) - Adds the installer module at runtime, to assist in configuring your installation. You would omit this from your run command, once your database has been configured
BE=true
In addition, the environment variables are also available to use in your container. For additional information on using the CommandBox docker image, see .
By default, the ContentBox image will use the Lucee Open Source CFML engine for running the application. It will also configure the datasource to store user sessions so you can easily scale the image or send it to Docker Swarm, Kubernetes, etc for scalability.
You can also use the SESSION_STORAGE environment variable to switch the connection to any backend you like.
By default, our image configures a jdbc CacheBox cache region that will be used to distribute settings, sessions, flash data, content, RSS feeds, sitemaps, etc. This means that out-of-the-box, your ContentBox containers can use the database to distribute its content within a swarm or set of services. However, if you would like to use your own CacheBox providers or a more sophisticated distributed cache like Redis or Couchbase, you can.
We have also prepared a docker-compose and distribution example using Redis (more caches to come) and the ContentBox image. This example will allow you to have a stack that can easily distribute your sessions and content via Redis. You can find the repository here:
Please check the Database for CF Sessions, to ensure this table is purging older expired values. If this table grows in size, you will notice performance hits and may need to schedule a purge or truncation manually.
The image contains built-in capabilities for health checks for the running application. You can customize the URL entry point by using the HEALTHCHECK_URI environment variable. By default, this is set http://127.0.0.1:${PORT}/ at 30s intervals with 5 retries and a timeout of 60s.
The ContentBox image for Docker re-vamps the entire Modular CMS game by de-coupling your customizations and user assets from the underlying framework. It can make your source code lighter-weight, as well as providing you with a standardized development environment, which matches your production container strategy.
To create or edit administrative users for ContentBox, select the User menu in the navigation bar on the left. The menu will drop down and you will need to select Manage.
Once in the User Management screen you will be presented with existing users, email addresses, roles and the last time a user logged in.
There is also a icon that will allow you to select user actions such as:
Edit User
Delete the user
Export the information for a user as JSON or XML to import to another site. This is a simple way to give users access to additional websites.
You will also see a star next to the user you are currently logged in as.
Above the users there is a bulk actions button. This allows you to import JSON or XML files or export all users as JSON or XML.
When managing large number of users, this screen might become overwhelming. On the right hand side you will have an option to help filter the users. You can filter by status or roles or a combination of both.
Click on create user in the top right corner of the User management box. On this screen you will see the user details. Fill out the details with * as these are required.
You will then need to choose if the user is active and what role you will assign to the user. (please see roles for further information)
Below here you have the option to enter a Biography or Notes About The User. This is not required.
Once this has all been completed, click save details at the bottom of the page.
The password has requirements to make sure that they are secure.
It requires the following:
8 Characters long
1 Capital letter
1 Number
1 Special Character (such as @#$%)
On the User Management page click on the User Action icon at the end of the user.
This will open up the editing page.
This looks a lot like the create user screen, however you will notice on the left hand side, there are Tabs, with categories of more information to save about a user.
The Details menu allows you the same information as creating a new user apart from the password. You are not able to change the password in this area.
Changing Password allows you to change your own password or reset the password for another user (given you have the correct permissions).
You can email a password reset to any user that is not the currently logged in user.
Two Factor Authentication
A user can enroll themselves in two factor authentication. The manage screen allows the user to configure any required information before starting the enrollment process.
To enroll, a user must successfully enter in the code or credentials sent via the default provider. On a successful entry, the user will be enrolled in two factor authentication.
Users are able to unenroll from two-factor authentication themselves from the manage screen. Users with an admin role assigned are able to unenroll not only themselves but other users as well.
If two factor authentication is being enforced, users will be forced to enroll in two factor authentication. if a user unenrolls from two-factor authentication a form to enroll in two-factor will be presented right away.
When a not enrolled user is logging in and the two-factor authentication is being enforced, the enrollment form will be presented and the user won't be able to see the dashboard or any other content unless a successful enrollment in two-factor authentication is performed.
The next menu is Preferences. In this menu you will notice there are areas for social media profiles and settings such as collapsed left nav bar enabling the user to setup contentbox the way they prefer.
The next menu is Permissions. In this area it enables you to see what permissions this user has (please see permissions for more information).
Role Permissions Role permissions are assigned to the user when creating the user by assigning the role. Each role has a default set of permissions allocated to it. If the user requires an additional role you can use the A-la-Carte Permission area below.
A-la-Carte Permissions In this section you can Assign A-la-Carte Permissions. This means that if someone doesn’t have access to a permission from their standard permission profile but needs access to it, you can give access to just that selection without enabling the user more access than needed.
The next Menu is Latest Edits. This will show you anything this user has edited. This will show you the title, date/time, whether it was published, and lets you view the change on the site by clicking the action button.
The last menu option is Latest Drafts. This will show you what work has been saved but not yet published. Again it will show you title, date/time and lets you edit the draft directly from this menu.
ContentBox's modular architecture, combined with the awesome power of the ColdBox MVC development framework, allows for a familiar, yet unrestricted, platform from which to develop great web applications.
If you're a Front End Developer, you'll appreciate the straightforward configuration and pre-defined ( but highly customizable! ) asset conventions.
Within the ColdBox framework, itself ContentBox is comprised of three modules:
contentbox - Includes the the underlying libraries for content organization and presentation
contentbox-admin - Provides the administrative interface for managing your CMS
contentbox-ui - Provides shared libraries for the user interface which are used for presentation and which may be extended to your application requirements.
Browse through our area-specific development documentation to get started:


# Format everything
box run-script format
# Start a watcher, type away, save and auto-format for you
box run-script format:watchinstall contentbox-cli# Create a new directory and go into it.
mkdir mysite --cd
# Run the installer wizard
contentbox install-wizardhttp://localhost:8500docker pull ortussolutions/contentbox &&
docker run -p 8080:8080 \
-e EXPRESS=true \
-e INSTALL=true \
ortussolutions/contentbox


HEALTHCHECK_URI - Specifies the URI endpoint for container health checks. By default, this is set http://127.0.0.1:${PORT}/ at 30s intervals with 5 retries and a timeout of 60s
FWREINIT_PW - Allows you to specify the reinit password for the ColdBox framework
SESSION_STORAGE - Allows the customization of session storage. Allows any valid this.sessionStorage value, available in Application.cfc. By default, it will use the JDBC connection to store your sessions in your database of choice.
DISTRIBUTED_CACHE - Allows you to specify a CacheBox cache region for distributing ContentBox content, flash messages, cache storage, RSS feeds, sitemaps, and settings. There are only three cache regions defined in this image: default, template and jdbc. jdbc is the default cache that will distribute your data, default and template are in-memory caches. Please see the distributed caching section below to see how to register more caches.
H2_DIR - Allows you to specify a custom directory path for your H2 database. By convention, this is set to /data/contentbox/db within the container
contentbox_default_* - All Contentbox "Geek Settings" may be provided as environment variables, allowing granular control of your ContentBox settings.
ORM_SECONDARY_CACHE - If true it will activate the ORM secondary cash to the ehcache provider. By default, it is turned off.
ORM_DIALECT - You can choose the specific ORM dialect if needed, if not we will try to auto-detect it for you.
HEADLESS=false - If true then this image will not publish an Admin module, just the core, REST and UI modules.
/data/contentbox/db
The express H2 database
/app/modules_app/contentbox-custom
The custom code module
/app/includes/shared/media
**The legacy media location, use the custom modules location instead.


The menu manager allows you to create 'Menus' to be used in a variety of ways in your ContentBox Website. A Menu can contains several Items, which can be from a range of Item types, Content like Pages and Blog posts, Media, Submenus, URLs, JS or Free type. Menus are easy to create, and give you a lot more options that relying on pages inside your traditional Sitemap structure.
By default, ContentBox sites use the Sitemap to generate a menu for display. To use a Menu instead of the Sitemap, you have to install a Theme which supports Menus, and then select the Menu you wish to use as you main site Menu.
Some Themes may support additional menus for top menus, footer menus, side bar menus. Please refer to your Theme.
Title: The name of the Menu
List Type: ( ul | ol ) Unordered List or Ordered List
Menu Slug: This is the code referenced slug, to be used to retrieve the Menu in the Theme or View, where required.
CSS Classes: Optional CSS Classes to be added to the Main Menu List itself ( ul or ol - when supported by the Theme )
Content
Media
Submenu
URL
Each content type has it's own set of attributes.
Label - Read Only - Same as the Item Content field below.
Item Content - This is Name/Title that shows in the Menu Item itself.
CSS Classes - Optional additional CSS classes to be added to the list item
Content refers to a Page, or Blog Entry. You can search and select the content item you wish this item to link to. The Item Content ( visible label for the menu item ) automatically populates when you select an item for Content Item.
In Addition to the Common Attributes listed above, this type also includes:
Content - This is a search and selection tool to help you select a page or blog entry for this Menu Item to link to.
URL Classes - Additional CSS for this Menu Item's HTML Element
Target - Allows you to select how the link is treated by the browser, allowing
Refers to Media from the Media Manager
In Addition to the Common Attributes listed above, this type also includes:
Media - This is a search and selection tool to help you select a media item from the Media Manager for this Menu Item to link to.
URL Classes - Additional CSS for this Menu Item's HTML Element
Target - Allows you to select how the link is treated by the browser, allowing
A Submenu type allows you to select an entire Menu to be included in the current Menu, as a Menu Item.
In Addition to the Common Attributes listed above, this type also includes:
Select Sub-menu - This is a drop down select list of all of the Menus available for selection.
Data Attributes - Allows you to add one or many data attributes for the menu item. You can use JSON ( {"me":"you"} ) or a comma-delimited list ( me=you,icecream=awesome )
Title - An accessible title, commonly used by browsers as a tool tip.
Note: This relies on the Theme you are using, to utilize this feature.
A URL allows you to add any linkable URL you might desire into your Menu.
In Addition to the Common Attributes listed above, this type also includes:
URL - The URL you wish to use for this menu item
URL Classes - Additional CSS for this Menu Item's HTML Element
Target - Allows you to select how the link is treated by the browser, allowing
Not all menu items will be Links to other HTTP resources, with todays applications, we are commonly using more and more JavaScript, and the Menu Manager allows you to add JavaScript into your Menu Items as well.
In Addition to the Common Attributes listed above, this type also includes:
JavaScript Code - JavaScript to be excuted when this Menu Item is clicked.
URL Classes - Additional CSS for this Menu Item's HTML Element
Data Attributes - Allows you to add one or many data attributes for the menu item. You can use JSON ( {"me":"you"} ) or a comma-delimited list ( me=you,icecream=awesome )
Title - An accessible title, commonly used by browsers as a tool tip.
This is a menu item that creates a 'free-text' menu item. This item only uses the common attributes, Item Content, and CSS Classes... listed above.
As you add, edit, and delete Menu Items, you can preview those menu items in page. You can refresh the menu by clicking the refresh icon next to the title Preview if the preview has not updated as expected.
The ContentBox system requirements
Let's start with system requirements for running ContentBox sites on all deployable options.
You need Java 11+ to run ContentBox.
You will need to have CommandBox for installation, upgrading, and optionally running your ContentBox sites. Please see our section.
ContentBox can be deployed to the following CFML Engines:
Adobe ColdFusion
2016 (End of life is December 2021)
2018 (Deprecated)
Here are the supported databases for ContentBox:
MySQL 5.7 (InnoDB ONLY!)
MySQL 8+ (InnoDB ONLY!)
Microsoft SQL Server 2012+
HypersonicSQL
If you have another database engine needing ContentBox support, please let us know, and we can help you ().
We have seen an issue where an error will be reported that cbPermission cannot be inserted. This is an issue where the JDBC driver will switch context and create the tables in the master schema and not the schema you chose. So please verify that the master schema has tables that start with cb_* and remove them and re-run the installer.
ContentBox relies on Search Engine Safe (SES) URLs and URL Routing. Most CFML engines already allow for these URLs out of the box, and ContentBox supports them out of the box. However, if you would like to use full URL rewriting (which we recommend, that's where the index.cfm is not showing in the URLs) you will need to use a web server rewriting tool, and ContentBox will configure it for you.
So before you install ContentBox, make sure that you are using one of the supported rewriting engines shown below:
CommandBox Server (Default)
Apache mod_rewrite
IIS 7 rewrite module
Tuckey rewrite filter
The ContentBox installer will create rewrite files automatically for you for Apache, IIS7, and express editions. You must add the rewrites yourself for Nginx or other rewrite engines and then manually modify the routing file.
Edit config/Router.cfc and set setFullRewrites to true. That's it!
ContentBox needs some files/folders to be writable at runtime.
You can remove the first three after installation.
Here are the folders for the core engine to work accordingly
This option is under Users in the left side navigation bar. This is a list of all permissions available for the site.
There is a quick search box at the top of the permissions page if you are looking for a specific permission.
On the permissions page you will see 4 headings.
Permission - This is the name of the permission
Description - This explains the permission and what access it allows for the user
Roles Assigned - This shows you how many users are using this permission currently.
Actions
Green Icon - Edit the permission
Red Delete Icon - Delete the permission.
Click Create Permission to add a permission. A permission consists of:
Permission ( commonly known as a slug / name )
Description
A Permission Slug can be referenced from inside of code used in Widgets, Modules, Themes, restricting access however you see fit. Creating a permission allows you to assign the permission to Roles and/or Users, but will not be functional without code referencing the Permission ( slug ).
A Permission ( slug ) can also be referenced from inside the Security Rules as well. Security rules are used to secure ContentBox according to incoming events or URLs, much like a firewall. See that System > Security Rules for more information on how Permissions are used.
In the top right section of the page, you will see a Bulk Actions button next to Create Permission. This allows you to do the following:
Import
Export All as JSON
Export All as XML
This is a nice feature when you manage several sites. You can setup permissions on one site, and then export them, and import them into the other sites you manage.
For safety reasons, when you Import Permissions, by default you will not override any content. If you have existing Permissions, that you want to be updated, please set Override Content to true. Otherwise existing content will be skipped during the import process.
Exporting to JSON or XML is a simple process. Click Bulk Actions and select your format, and in seconds you will see a file download prompt pop up, asking you to open or save your file ( in most browsers ).


docker run -p 8080:8080 \
-e EXPRESS=true \
-e INSTALL=true \
-v `pwd`/contentbox-db:/data/contentbox/db \
-v `pwd`/contentbox-custom:/app/modules_app/contentbox-custom \
ortussolutions/contentboxdocker run -p 8080:8080 \
-e EXPRESS=true \
-v `pwd`/contentbox-db:/data/contentbox/db \
-v `pwd`/contentbox-media:/app/includes/shared/media \
ortussolutions/contentboxdocker run -p 8080:8080 \
-e 'INSTALL=true' \
-e 'CFCONFIG_ADMINPASSWORD=myS3cur3P455' \
-e "DB_CONNECTION_STRING=jdbc:mysql://mysqlhost:3306/contentbox_docker?useUnicode=true&characterEncoding=UTF-8&useLegacyDatetimeCode=true" \
-e 'DB_CLASS=org.gjt.mm.mysql.Driver' \
-e 'DB_USER=contentbox_user' \
-e 'DB_PASSWORD=myS3cur3P455' \
-v `pwd`/contentbox-media:/app/includes/shared/media \
ortussolutions/contentboxdocker run -p 8080:8080 \
-e 'CFENGINE=adobe@11' \
-e 'INSTALL=true' \
-e 'CFCONFIG_ADMINPASSWORD=myS3cur3P455' \
-e 'DB_DRIVER=MSSQLServer' \
-e 'DB_HOST=sqlserver_host' \
-e 'DB_PORT=1433' \
-e 'DB_NAME=contentbox_docker' \
-e 'DB_USER=sa' \
-e 'DB_PASSWORD=myS3cur3P455' \
-v `pwd`/contentbox-media:/app/includes/shared/media \
ortussolutions/contentbox


2023
Lucee
5+
6+
Apache Derby
PostgreSQL
Oracle 11g+
Nginx
function configure(){
// Configuration
setValidExtensions( 'xml,json,jsont,rss,html,htm,cfm,print,pdf,doc,txt' );
// Process Full Rewrites then true, else false and an `index.cfm` will always be included in URLs
setFullRewrites( true );
}{Root}/Application.cfc
{Root}/config/ColdBox.cfc
{Root}/config/modules
{Root}/coldbox/system/aop/tmp# Engine Operation (REQUIRED)
{Root}/coldbox/system/aop/tmp
# Media Manager
{Root}/modules_app/contentbox-custom/contentList CSS Classes: Optional CSS Classes to be added to each of the List Items ( li - when supported by the Theme )
JS
Free
_blank
_parent
_top
Data Attributes - Allows you to add one or many data attributes for the menu item. You can use JSON ( {"me":"you"} ) or a comma-delimited list ( me=you,icecream=awesome )
Title - An accessible title, commonly used by browsers as a tool tip.
_blank
_parent
_top
Data Attributes - Allows you to add one or many data attributes for the menu item. You can use JSON ( {"me":"you"} ) or a comma-delimited list ( me=you,icecream=awesome )
Title - An accessible title, commonly used by browsers as a tool tip.
_blank
_parent
_top
Data Attributes - Allows you to add one or many data attributes for the menu item. You can use JSON ( {"me":"you"} ) or a comma-delimited list ( me=you,icecream=awesome )
Title - An accessible title, commonly used by browsers as a tool tip.


Deploy ContentBox on an existing ColdBox application.
If you already have a ColdBox application and wish to install ContentBox, you most definitely can.
Please note that ContentBox requires ColdBox 7.x
Since version 3.5.0, you can now issue a command in CommandBox to install the ContentBox module into an existing ColdBox application. Just open a box shell in the root of your ColdBox application and use the following command:
This will install the ContentBox module with all of its dependencies under the /modules/contentbox and the ContentBox installer module under /modules/contentbox-installer.
If you are using Lucee, then you need to use the Ortus ORM Extension
Application.cfc UpdatesNow open your Application.cfc and you will add the following updates:
.env SettingsBelow are the env settings for ContentBox to run, spice up as needed
Here is the collection of the latest module settings for ContentBox. Make sure you copy/merge the settings found here:
CacheBox.cfc SettingsOpen your CacheBox configuration file: config/CacheBox.cfc and add the following cache declarations:
Once these updates are done, then you can start up the server and visit the installer URL: http://localhost:port/cbInstaller
By default ContentBox is in take over mode. Meaning that the UI module will intercept all calls made to the application and process them as pages or blog entries. If you DO NOT want this to happen, then you can segregate the UI module into a single entry point URL like blog or site or pages. You can do this by opening the following file: modules/contentbox-ui/ModuleConfig.cfc and looking for the following code:
Now update the this.entryPoint to whatever you like the entry point URL to be. Restart the application and voila!


install contentbox,contentbox-installer-modulebox install [email protected]// UTC timezone
this.timezone = "UTC";
// LOCATION MAPPINGS
this.mappings[ "/contentbox" ] = COLDBOX_APP_ROOT_PATH & "modules/contentbox";
// THE LOCATION OF THE ORM MODULE
this.mappings[ "/cborm" ] = this.mappings[ "/contentbox" ] & "/modules/contentbox-deps/modules/cborm";/**
* --------------------------------------------------------------------------
* ORM + Datasource Settings
* --------------------------------------------------------------------------
* - Please update the cfcLocation as needed to locate more ORM entities for your app
* - Dialect is incredibly important! Do not let Hibernate auto configur it, you can get nasty errors.
* So Make sure you select one.
*/
request.cbSystemHelper = new coldbox.system.core.delegates.Env();
// THE CONTENTBOX DATASOURCE NAME
this.datasource = "contentbox";
// ORM SETTINGS
this.ormEnabled = true;
// cfformat-ignore-start
this.ormSettings = {
// ENTITY LOCATIONS, ADD MORE LOCATIONS AS YOU SEE FIT
cfclocation : [
// If you create your own app entities
"models",
// The ContentBox Core Entities
"modules/contentbox/models",
// Custom Module Entities
"modules_app",
// Custom Module User Entities
"modules/contentbox/modules_user"
],
// THE DIALECT OF YOUR DATABASE OR LET HIBERNATE FIGURE IT OUT, UP TO YOU TO CONFIGURE.
dialect : request.cbSystemHelper.getSystemSetting( "ORM_DIALECT", "" ),
dbcreate : "none",
secondarycacheenabled: request.cbSystemHelper.getSystemSetting( "ORM_SECONDARY_CACHE", false ),
cacheprovider : request.cbSystemHelper.getSystemSetting( "ORM_SECONDARY_CACHE", "ehCache" ),
logSQL : request.cbSystemHelper.getSystemSetting( "ORM_LOGSQL", false ),
sqlScript : request.cbSystemHelper.getSystemSetting( "ORM_SQL_SCRIPT", "" ),
// ORM SESSION MANAGEMENT SETTINGS, DO NOT CHANGE
flushAtRequestEnd : false,
autoManageSession : false,
// ORM EVENTS MUST BE TURNED ON FOR CONTENTBOX TO WORK DO NOT CHANGE
eventHandling : true,
eventHandler : "cborm.models.EventHandler",
// THIS IS ADDED SO OTHER CFML ENGINES CAN WORK WITH CONTENTBOX
skipCFCWithError : true,
// TURN ON FOR Debugging if ORM mappings are not working.
savemapping : false
};
// cfformat-ignore-end#################################################################
# App Name and Environment
#################################################################
APPNAME=ContentBox Dev
# This can be development, staging, production or custom.
ENVIRONMENT=development
# The password for the CFML Engine Administrator
CFCONFIG_ADMINPASSWORD=contentbox
# The ColdBox Reinit password
COLDBOX_REINITPASSWORD=contentbox
# How long do admin sessions last (In Minutes)
COLDBOX_SESSION_TIMEOUT=60
# Development CBDebugger
CBDEBUGGER_ENABLED=true
#################################################################
# ContentBox ORM Settings
# --------------------------------
# This is used to configure the ORM via env settings usually for
# different RDBMS settings or options
#################################################################
# Dialect choices:
# MySQL, Hypersonic => org.hibernate.dialect.MySQL5InnoDBDialect,
# PostgreSQL => PostgreSQL
# Microsoft SQL => org.hibernate.dialect.SQLServer2008Dialect
# Oracle => Oracle10g
# Derby => Derby
ORM_DIALECT=org.hibernate.dialect.MySQL5InnoDBDialect
# Log sql to the console or not
ORM_LOGSQL=false
# Sql Script to execute after ORM is initialized
ORM_SQL_SCRIPT=
# Activate secondary cache or disable it
ORM_SECONDARY_CACHE=false
ORM_SECONDARY_CACHE_PROVIDER=ehcache
#################################################################
# ContentBox Datsource and Migrations Variables
# ----------------------------------------------------------------
# These settings configure the datasource connection to your database
# Please make sure you read the comments as there are differences
# between Adobe and Lucee. Uncomment your rdbms of choice, the options are:
# - MySQL 5.7
# - MySQL 5.8
# - PostgreSQL
# - Microsoft SQL
# - Custom Database
#################################################################
######################################################
# Database Datasource Connection
######################################################
DB_DRIVER=MySQL
DB_CLASS=com.mysql.cj.jdbc.Driver
DB_BUNDLEVERSION=8.0.24
DB_BUNDLENAME=com.mysql.cj
# DB Location
DB_HOST=localhost
DB_PORT=3306
DB_CONNECTIONSTRING=jdbc:mysql://localhost:3306/contentbox?allowPublicKeyRetrieval=true&useSSL=false&useUnicode=true&characterEncoding=UTF-8&serverTimezone=UTC&useLegacyDatetimeCode=true
# DB Credentials
DB_DATABASE=contentbox
DB_USER=root
DB_PASSWORD=ortussolutions
#################################################################
# JWT Information
# --------------------------------
# You can seed the JWT secret below or you can also leave it empty
# and ContentBox will auto-generate one for you that rotates
# everytime the application restarts or expires
#################################################################
JWT_SECRET=YQSUGww+IQQUhOfZxVhFnDMNtN0fV1uH8hEvMTt+Nao=
#################################################################
# AWS S3 or Digital Ocean Spaces
# --------------------------------
# If you are using any of our S3/Spaces compatible storages, you
# will have to seed your credentials and information below
#################################################################
S3_ACCESS_KEY=
S3_SECRET_KEY=
S3_REGION=us-east-1
S3_DOMAIN=amazonaws.com
S3_BUCKET=// Register all the custom named caches you like here
caches = {
// Named cache for all coldbox event and view template caching
template = {
provider = "coldbox.system.cache.providers.CacheBoxColdBoxProvider",
properties = {
objectDefaultTimeout = 120,
objectDefaultLastAccessTimeout = 30,
useLastAccessTimeouts = true,
freeMemoryPercentageThreshold = 0,
reapFrequency = 2,
evictionPolicy = "LRU",
evictCount = 5,
maxObjects = 5000,
objectStore = "ConcurrentSoftReferenceStore" //memory sensitive
}
},
// ContentBox Sessions
sessions = {
provider = "coldbox.system.cache.providers.CacheBoxColdBoxProvider",
properties = {
objectDefaultTimeout = 60,
objectDefaultLastAccessTimeout = 0,
useLastAccessTimeouts = false,
freeMemoryPercentageThreshold = 0,
reapFrequency = 2,
evictionPolicy = "LRU",
evictCount = 5,
maxObjects = 1000, // Can support up to 1000 user sessions concurrently. Modify if needed. 0 = unlimited
objectStore = "ConcurrentStore"
}
}
}// YOUR SES URL ENTRY POINT FOR CONTENTBOX, IF EMPTY IT WILL TAKE OVER THE ENTIRE APPLICATION
// IF YOU WANT TO SECTION OFF CONTENTBOX THEN FILL OUT AN SES ENTRY POINT LIKE /site OR /content
// BY DEFAULT IT TAKES OVER THE ENTIRE APPLICATION
this.entryPoint = "";


December 18, 2023
ContentBox 6 is a major update for this CMS and its supporting libraries. This version includes many improvements and stability enhancements that will make your content fly.
Our release notes are here, and we will discuss our major areas of improvement for this release. If you need to upgrade your previous versions of ContentBox, please see our upgrade guide.
The ContentBox CLI based on CommandBox is also updated to support ContentBox 6 natively:
That's it. This will install the contentbox namespace to assist you in your ContentBox adventures. Please see the guide on usage.
We have upgraded our core to ColdBox 7, and we have received a tremendous amount of benefits (). Here are some of the features we get with this upgrade:
New CFML Engines Support
JDK 11 and 17 Support
Asynchronous programming. We have introduced the concepts of the async package to the core and ContentBox will leverage more of these features for background job processing, automation and much more.
We have migrated our cbsecurity module to the latest version to give you a wealth of features () such as:
Fortified rule engine
Firewall Visualizer
Delegations
JWT enhancements
We have released our own Hibernate support extension for Lucee:
This comes with tons of features, enhancements, and speed.
Most content objects have the same type of content over and over again. ContentBox content templates will allow you to capture this content into a reusable template that can be easily recreated.
Content Templates are stored according to the three main ContentBox types or globally for all content types:
Entry
Page
ContentStore
The content templates will capture the following information:
Title
Content
Description (content store)
Excerpt (page, entry)
This information will be restored once you start a new content object based on the template.
You can add as many domain aliases as you want to site definitions. This will allow ContentBox to match 1 or more domain expressions to one site.
Previously, all releases relied on the Hibernate Schema builder to build the initial database. This was great initially, but dealing with four major RDBS and the different intricacies they bring was a disaster and a pain to manage. With the advent of , we have moved all our database schema-related operations to source-controlled migrations.
You will now find a few valuable scripts in your box.json
contentbox:migrate:up
contentbox:migrate:down
You can also create your custom migrations using the default manager and source control additions to your ContentBox installations. They will be stored in the resources/database folder.
The module is now included to assist with headless communication and API deployment. You can configure it like any other ColdBox module.
We have started to introduce focus modes wherever content can be edited. This creates a seamless experience so you can focus on content editing and no distractions.
now powers our ContentBox media manager. Our ColdBox File System module. This increases the performance of all file operations and allows you to store the media content on any CBFS Disk: local, RAM, AWS, Digital Ocean, Google Cloud Storage, and more.
The menu manager has been upgraded to render previews correctly and help you build reusable menu content. We are not done, but it's a step up.
If you change the slug a new page redirect will be created for you on any page or blog entry. For SEO purposes, all slug changes will be kept in our new page redirects table. You can also add manual redirects within each content piece if you want as well. A great win for SEO!
Import With Overwrite Throws an Error
UI Disappoints in Menu Manager and Broken ContentMenuItem Functionality
Issue Importing Site using ContentBox 5.03 and a fresh export
ContentBox Content Templates
Add Child Layout Property to Pages
use onServerInstall migration scripts from latest CommandBox on server scripts
Menu Manager Improvements
Add historical slug storage and automatic redirects
Editors Should Have the Ability to Evict Content Cache with new permission: RELOAD_CACHES
Migrate UI development from bower/grunt to npm/elixir
Convert from Yarn to NPM for package management
Update Panels Styles
box install contentbox-cliBetter exception handling for developers
REST Handlers and highly performant REST Routing
Transient and ORM performance
ColdBox Delegates
App Modes
Date Helpers
Tons of Scheduled task updates
Much more!
Cross-site request forgery support
Custom Fields
Categories
SEO
Modifiers
Cache Settings
Featured Image
Display Options (Page)
Editor in Use
Markup
CONTENTBOX-1427 CBRequest postRender of AdminBar will throw errors if Buffer is flushed to Browser
CONTENTBOX-1428 Incorrect Site and Parent Re-Assignment When Using Admin Bar Edit
CONTENTBOX-1439 NOW for a new blog post doesn't update the time anymore with the alpine updates
CONTENTBOX-1445 Menu Manager Create new does not working
CONTENTBOX-1450 menu manager sandbox display is broken
CONTENTBOX-1453 modules_user is not currently included in the ormSettings so some contentbox modules on forgebox don't work without Application.cfc being updated by the user
CONTENTBOX-1454 files fail to upload in media manager after server restart
CONTENTBOX-1462 Generated Sitemap has broken links
CONTENTBOX-1467 FeedGenerator.cfc Incompatible with ACF 2018+
CONTENTBOX-1468 getOpenGraphMeta broken for description
CONTENTBOX-1472 Ensure visibility of Menu Toggle in mobile views
CONTENTBOX-1476 Links do not have enough contrast
CONTENTBOX-1481 Missing Icons
CONTENTBOX-1482 PageInclude/EntryInclude/Menu widgets are not including the current site
CONTENTBOX-1484 Menu Preview Error
CONTENTBOX-1496 checkAll failing due to window scoping issues
CONTENTBOX-1498 Missing fieldset tag
CONTENTBOX-1499 An error is recorded in the log when initialising a custom widget in an add-on module
CONTENTBOX-1480 cfconfig definitions additions to the server definitions
CONTENTBOX-1487 Ability to define domain aliases for sites for domain detection
CONTENTBOX-1491 Migration to cfmigrations for full database and seeding creations instead of ORM
CONTENTBOX-1492 Added the cors module to the site since we have API deployments now
CONTENTBOX-1497 New Content Editing Focus mode to remove distractions
CONTENTBOX-1452 Convert File Operations to cbfs
CONTENTBOX-1447 Logical Groupings for Content Template Form Fields
CONTENTBOX-1448 Move Global Content Template Assignment Up to Template List
CONTENTBOX-1455 'Remove All' button is displayed under Blog > Custom Fields even when there are no custom fields defined.
CONTENTBOX-1458 Remove content returnformats for pdf to avoid server and bot attacks
CONTENTBOX-1469 Improve position of the menu toggle
CONTENTBOX-1474 Enhance logo quality
CONTENTBOX-1488 latest logins should only be displayed if the tracker is enabled
CONTENTBOX-1489 SEO for meta data on home page, needs to follow site rules instead of page only rules
CONTENTBOX-1490 Removed moment js to luxon for increased support and viability
CONTENTBOX-1494 When using hierarchical slugs on the contentstore and pages the api does not work for retreiveing the right slug due to CF decoding of encoded slugs
CONTENTBOX-1473 Update Sidebar Styles
CONTENTBOX-1478 Remove old tuckey urlrewrite.xml as this is now in the CommandBox Core
CONTENTBOX-1493 ContentBox Express removed since we now have CommandBox


// Register the disks on the system
"disks" : {
// Your default application storage
"contentbox" : {
provider : "Local",
properties : {
path : "#controller.getAppRootPath()#modules_app/contentbox-custom/_content",
diskUrl : function(){
return application.wirebox
.getInstance( "CBHelper@contentBox" )
.site()
.getSiteRoot()
&
"/modules_app/contentbox-custom/_content/"
}
}
}
}
Geek Setting ( key )
Type
Default
Description
cb_active
boolean
true
cb_admin_quicksearch_max
numeric
5
cb_admin_ssl
boolean
false
cb_admin_theme
string
contentbox-default
cb_comments_captcha
boolean
true
cb_comments_enabled
boolean
true
cb_comments_maxDisplayChars
string
500
cb_comments_moderation
boolean
true
cb_comments_moderation_blacklist
string
(empty string)
cb_comments_moderation_blockedlist
string
(empty string)
cb_comments_moderation_expiration
string
30
cb_comments_moderation_notify
boolean
true
cb_comments_moderation_whitelist
boolean
true
cb_comments_notify
boolean
true
cb_comments_notifyemails
string
(empty string)
cb_comments_urltranslations
boolean
true
cb_comments_whoisURL
string
http://whois.arin.net/ui/query.do?q
cb_content_bot_regex
string
Google|msnbot|Rambler|Yahoo|AbachoBOT|accoona|AcioRobot|ASPSeek|CocoCrawler|Dumbot|FAST-WebCrawler|GeonaBot|Gigabot|Lycos|MSRBOT|Scooter|AltaVista|IDBot|eStyle|Scrubby
cb_content_cacheName
string
Template
cb_content_caching
boolean
true
cb_content_cachingHeader
boolean
true
cb_content_cachingTimeout
string
60
cb_content_cachingTimeoutIdle
string
15
cb_content_hit_count
boolean
true
cb_content_hit_ignore_bots
boolean
false
cb_content_uiexport
boolean
true
cb_contentstore_caching
boolean
true
cb_dashboard_newsfeed
string
http://www.ortussolutions.com/blog/rss
cb_dashboard_newsfeed_count
string
5
cb_dashboard_recentComments
string
5
cb_dashboard_recentEntries
string
5
cb_dashboard_recentPages
string
5
cb_dashboard_recentcontentstore
string
5
cb_dashboard_welcome_body
string
(empty string)
cb_dashboard_welcome_title
string
Dashboard
cb_editors_default
string
ckeditor
cb_editors_markup
string
HTML
cb_entry_caching
boolean
true
cb_gravatar_display
boolean
true
cb_gravatar_rating
string
PG
cb_html_afterBodyStart
string
(empty string)
cb_html_afterContent
string
(empty string)
cb_html_afterFooter
string
(empty string)
cb_html_afterSideBar
string
(empty string)
cb_html_beforeBodyEnd
string
(empty string)
cb_html_beforeContent
string
(empty string)
cb_html_beforeHeadEnd
string
(empty string)
cb_html_beforeSideBar
string
(empty string)
cb_html_postArchivesDisplay
string
(empty string)
cb_html_postCommentForm
string
(empty string)
cb_html_postEntryDisplay
string
(empty string)
cb_html_postIndexDisplay
string
(empty string)
cb_html_postPageDisplay
string
(empty string)
cb_html_preArchivesDisplay
string
(empty string)
cb_html_preCommentForm
string
(empty string)
cb_html_preEntryDisplay
string
(empty string)
cb_html_preIndexDisplay
string
(empty string)
cb_html_prePageDisplay
string
(empty string)
cb_media_acceptMimeTypes
string
(empty string)
cb_media_allowDelete
boolean
true
cb_media_allowDownloads
boolean
true
cb_media_allowUploads
boolean
true
cb_media_createFolders
boolean
true
cb_media_directoryRoot
string
/contentbox/content
cb_media_html5uploads_maxFileSize
string
100
cb_media_html5uploads_maxFiles
string
25
cb_media_provider
string
CFContentMediaProvider
cb_media_provider_caching
boolean
true
cb_media_quickViewWidth
string
400
cb_notify_author
boolean
true
cb_notify_contentstore
boolean
true
cb_notify_entry
boolean
true
cb_notify_page
boolean
true
cb_page_excerpts
boolean
true
cb_paging_bandgap
string
5
cb_paging_maxRSSComments
string
10
cb_paging_maxentries
string
10
cb_paging_maxrows
string
20
cb_rss_cacheName
string
Template
cb_rss_caching
boolean
true
cb_rss_cachingTimeout
string
60
cb_rss_cachingTimeoutIdle
string
15
cb_rss_copyright
string
Ortus Solutions Corp (www.ortussolutions.com)
cb_rss_description
string
ContentBox RSS Feed
cb_rss_generator
string
ContentBox by Ortus Solutions
cb_rss_maxComments
string
10
cb_rss_maxEntries
string
10
cb_rss_title
string
RSS Feed by ContentBox
cb_rss_webmaster
string
(empty string)
cb_salt
string
10D182FA83578E7CEED20AE1CE4FEFC9240F6C1FEC9377D1EEE365E706B9124494E65338734BC29AB4FA5230A731EF3638B186CCB8AD7F63BE862123C301D5E8
cb_search_adapter
string
contentbox.models.search.DBSearch
cb_search_maxResults
string
20
cb_security_blocktime
string
5
cb_security_latest_logins
string
10
cb_security_login_blocker
boolean
true
cb_security_max_attempts
string
5
cb_security_max_auth_logs
string
500
cb_security_rate_limiter
boolean
true
cb_security_rate_limiter_bots_only
boolean
true
cb_security_rate_limiter_count
string
4
cb_security_rate_limiter_duration
string
1
cb_security_rate_limiter_message
string
"<p>You are making too many requests too fast please slow down and wait {duration} seconds</p>"
cb_site_adminbar
boolean
true
cb_site_blog_entrypoint
string
blog
cb_site_description
string
(empty string)
cb_site_disable_blog
boolean
false
cb_site_email
string
(entered during initial site setup)
cb_site_homepage
string
cbBlog
cb_site_keywords
string
(empty string)
cb_site_mail_password
string
(empty string)
cb_site_mail_server
string
(empty string)
cb_site_mail_smtp
string
25
cb_site_mail_ssl
boolean
false
cb_site_mail_tls
boolean
false
cb_site_mail_username
string
(empty string)
cb_site_maintenance
boolean
false
cb_site_maintenance_message
string
"<h1>This site is down for maintenance.<br /> Please check back again soon.</h1>"
cb_site_name
string
(entered during initial site setup)
cb_site_outgoingEmail
string
(entered during initial site setup)
cb_site_poweredby
boolean
true
cb_site_settings_cache
string
Template
cb_site_sitemap
boolean
true
cb_site_ssl
boolean
false
cb_site_tagline
string
(entered during initial site setup)
cb_site_theme
string
default
cb_theme_default_cbBootswatchTheme
string
green
cb_theme_default_cssStyleOverrides
string
(empty string)
cb_theme_default_footerBox
string
(empty string)
cb_theme_default_headerLogo
string
(empty string)
cb_theme_default_hpHeaderBg
string
green
cb_theme_default_hpHeaderBgPaddingBottom
string
50px
cb_theme_default_hpHeaderBgPaddingTop
string
100px
cb_theme_default_hpHeaderBgPos
string
Top Center
cb_theme_default_hpHeaderBtnStyle
string
primary
cb_theme_default_hpHeaderBtnText
string
(empty string)
cb_theme_default_hpHeaderImgBg
string
(empty string)
cb_theme_default_hpHeaderLink
string
(empty string)
cb_theme_default_hpHeaderText
string
(empty string)
cb_theme_default_hpHeaderTitle
string
(empty string)
cb_theme_default_overrideHeaderBGColor
string
(empty string)
cb_theme_default_overrideHeaderColors
boolean
false
cb_theme_default_overrideHeaderTextColor
string
(empty string)
cb_theme_default_rssDiscovery
boolean
true
cb_theme_default_showArchivesBlogSide
boolean
true
cb_theme_default_showCategoriesBlogSide
boolean
true
cb_theme_default_showEntriesSearchBlogSide
boolean
true
cb_theme_default_showEntryCommentsBlogSide
boolean
true
cb_theme_default_showRecentEntriesBlogSide
boolean
true
cb_theme_default_showSiteSearch
boolean
true
cb_theme_default_showSiteUpdatesBlogSide
boolean
true
cb_versions_commit_mandatory
boolean
false
cb_versions_max_history
string
(empty string)
cb_editors_ckeditor_excerpt_toolbar
JSON
[\r\n { \name\": \"document\" \"items\" : [ \"Source\",\"-\",\"Maximize\",\"ShowBlocks\" ] },\r\n { \"name\": \"basicstyles\", \"items\" : [ \"Bold\",\"Italic\",\"Underline\",\"Strike\",\"Subscript\",\"Superscript\"] },\r\n { \"name\": \"paragraph\", \"items\" : [ \"NumberedList\",\"BulletedList\",\"-\",\"Outdent\",\"Indent\",\"CreateDiv\"] },\r\n { \"name\": \"links\", \"items\" : [ \"Link\",\"Unlink\",\"Anchor\" ] },\r\n { \"name\": \"insert\", \"items\" : [ \"Image\",\"Flash\",\"Table\",\"HorizontalRule\",\"Smiley\",\"SpecialChar\" ] },\r\n { \"name\": \"contentbox\", \"items\" : [ \"MediaEmbed\",\"cbIpsumLorem\",\"cbWidgets\",\"cbContentStore\",\"cbLinks\",\"cbEntryLinks\" ] }\r\n]
cb_editors_ckeditor_extraplugins
string
cbKeyBindingcbWidgets,cbLinks,cbEntryLinks,cbContentStore,cbIpsumLorem,wsc,mediaembed,insertpre,justify,colorbutton,showblocks,find,div,smiley,specialchar,iframe
cb_editors_ckeditor_toolbar
JSON
[\r\n{ \name\": \"document\" \"items\" : [ \"Source\",\"-\",\"Maximize\",\"ShowBlocks\" ] },\r\n{ \"name\": \"clipboard\", \"items\" : [ \"Cut\",\"Copy\",\"Paste\",\"PasteText\",\"PasteFromWord\",\"-\",\"Undo\",\"Redo\" ] },\r\n{ \"name\": \"editing\", \"items\" : [ \"Find\",\"Replace\",\"SpellChecker\"] },\r\n{ \"name\": \"forms\", \"items\" : [ \"Form\", \"Checkbox\", \"Radio\", \"TextField\", \"Textarea\", \"Select\", \"Button\",\"HiddenField\" ] },\r\n\"/\",\r\n{ \"name\": \"basicstyles\", \"items\" : [ \"Bold\",\"Italic\",\"Underline\",\"Strike\",\"Subscript\",\"Superscript\",\"-\",\"RemoveFormat\" ] },\r\n{ \"name\": \"paragraph\", \"items\" : [ \"NumberedList\",\"BulletedList\",\"-\",\"Outdent\",\"Indent\",\"-\",\"Blockquote\",\"CreateDiv\",\"-\",\"JustifyLeft\",\"JustifyCenter\",\"JustifyRight\",\"JustifyBlock\",\"-\",\"BidiLtr\",\"BidiRtl\" ] },\r\n{ \"name\": \"links\", \"items\" : [ \"Link\",\"Unlink\",\"Anchor\" ] },\r\n\"/\",\r\n{ \"name\": \"styles\", \"items\" : [ \"Styles\",\"Format\" ] },\r\n{ \"name\": \"colors\", \"items\" : [ \"TextColor\",\"BGColor\" ] },\r\n{ \"name\": \"insert\", \"items\" : [ \"Image\",\"Table\",\"HorizontalRule\",\"Smiley\",\"SpecialChar\",\"Iframe\",\"InsertPre\"] },\r\n{ \"name\": \"contentbox\", \"items\" : [ \"MediaEmbed\",\"cbIpsumLorem\",\"cbWidgets\",\"cbContentStore\",\"cbLinks\",\"cbEntryLinks\" ] }\r\n]